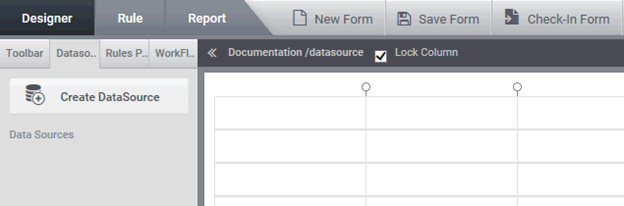
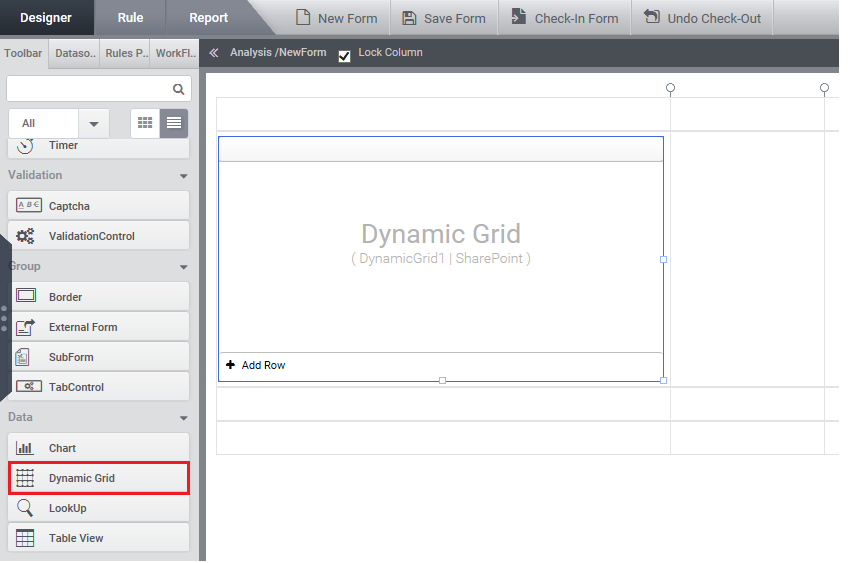
The below image gives the navigation links for the Admin user to reach different sections of the ClaySys AppForms.
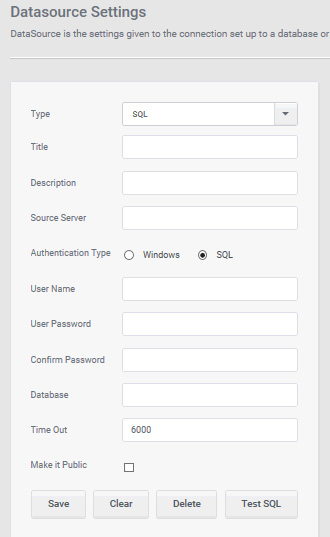
In the section Data Management, we have a link to go to the DataSource Settings, where we can create the different DataSources.
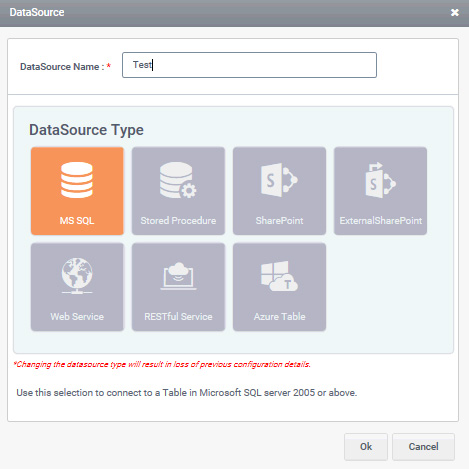
The type of the data source that needs to be created can be selected from the ‘Type’ drop down. Also we have two options for the Authentication Type: Windows and SQL.
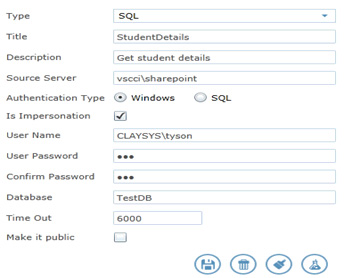
For using the impersonation we need to select the Authentication Type as windows. On selecting this Authentication Type, a check box to select impersonation will be visible. Select the impersonation check box and the below given UI will be visible. Fill the details of the database to be connected and give the user name and password for the impersonated user in the fields. Test the connection by clicking on the test connection icon (4th icon). If we select the ‘Make it public’ check box this Data source will be available across all sites.
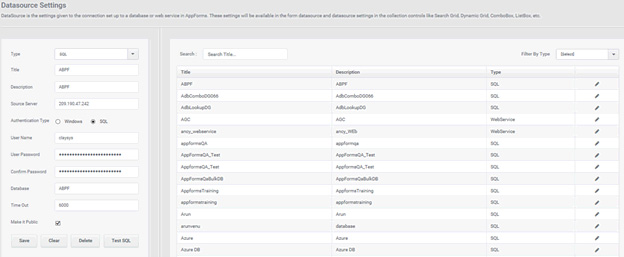
Once the “test connection is succeeded” notification is shown, we can save the DataSource and that will be available to use in the right pane. These DataSources will be available in the form to connect to the respective DataSource.
2.Connecting to the DataSource
Create a DataSource: Click on DataSources and then on ‘Create DataSource’ to Create/Add a data source to a form.
On clicking ‘Create DataSource’ a pop up comes up to select the type of DataSource being used.
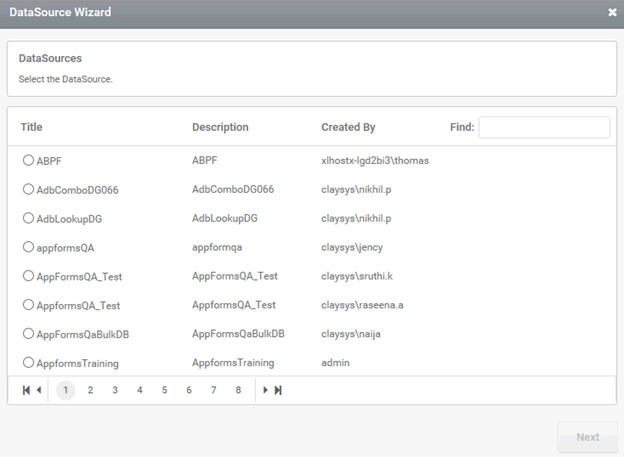
On selecting MS SQL, a list of all the available databases in the site is displayed. On selecting a data base and clicking Next button, all tables available in the corresponding database will be displayed from which a table can be selected.
The Dynamic Grid feature in AppForms has been upgraded with a ‘Row Split’ feature as compared to the older build. This particular enhancement in the latest build of AppForms would facilitate the user to split a row in a dynamic grid based on its index (column and row). Below mentioned is the guide to configure the Dynamic Grid.
Dynamic Grid – Configuration.
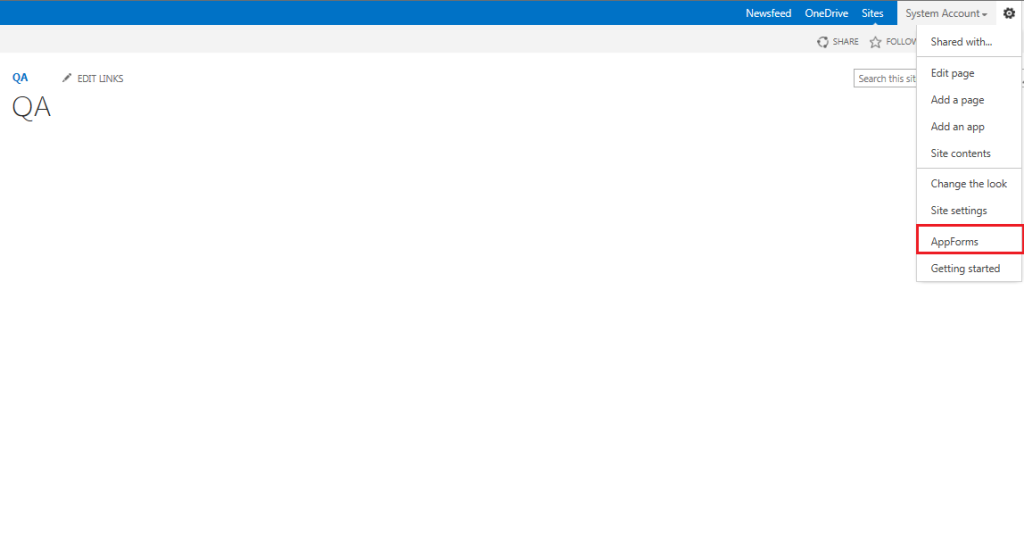
Step 1: Login into AppForms.
Figure 1
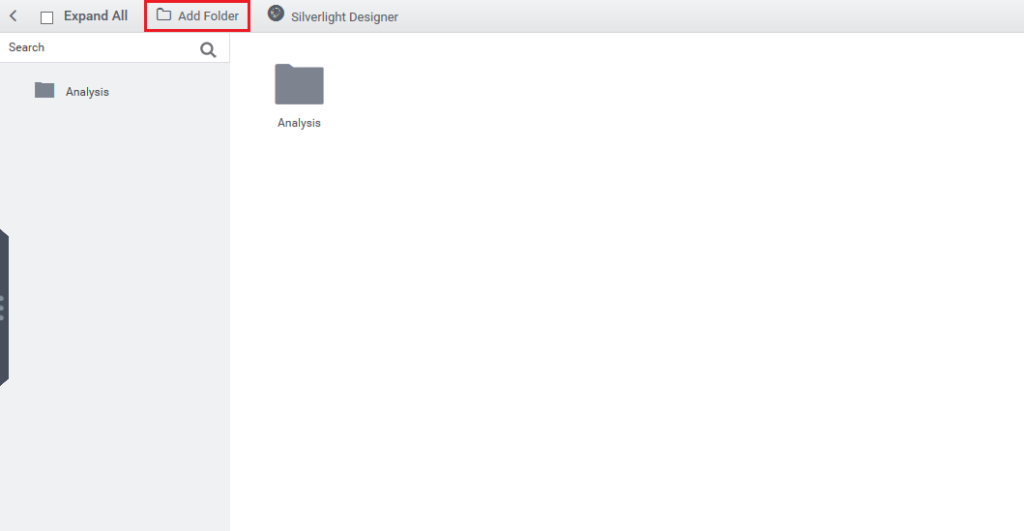
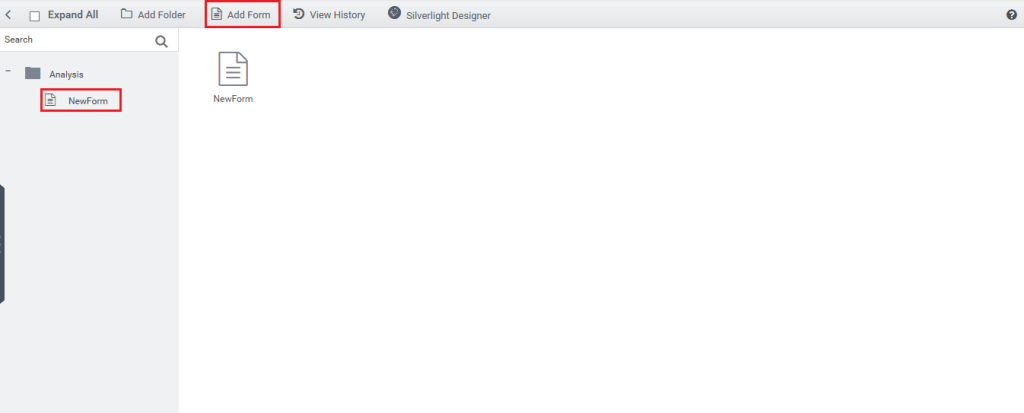
Step 2: Create a New Folder and within that folder create a New Form.
Figure 2Figure 3
Step 3: As shown in the figure 4, in the ‘Data’ from the ‘Toolbox’, select the Control ‘Dynamic Grid’ and create a form.
Figure 4
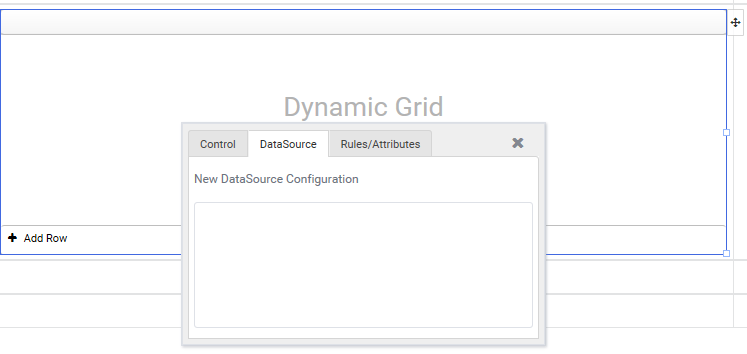
Step 4: Configure the dynamic grid with a DataSource.
Figure 5
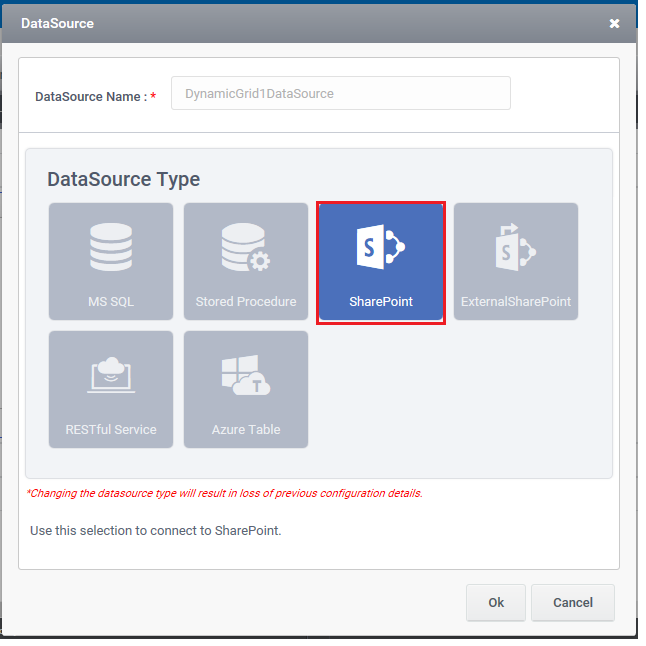
Step 5: Select the data source type from the ‘DataSource Type Select’ window and click the ‘Ok’ button.
Figure 6
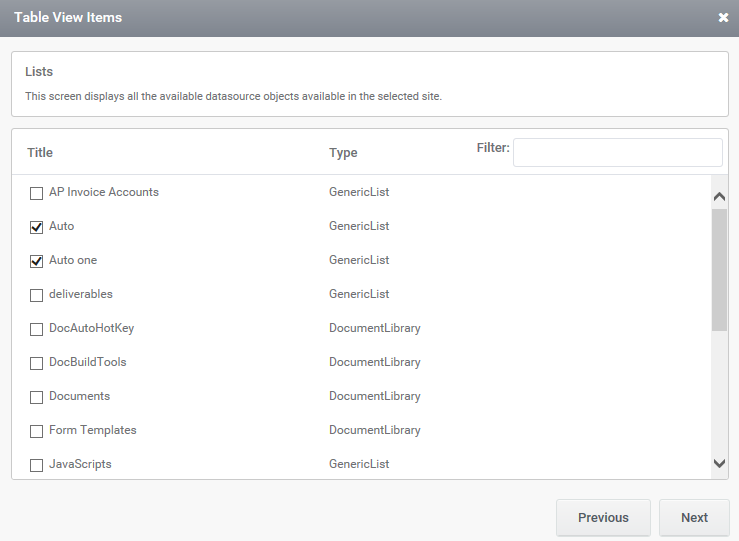
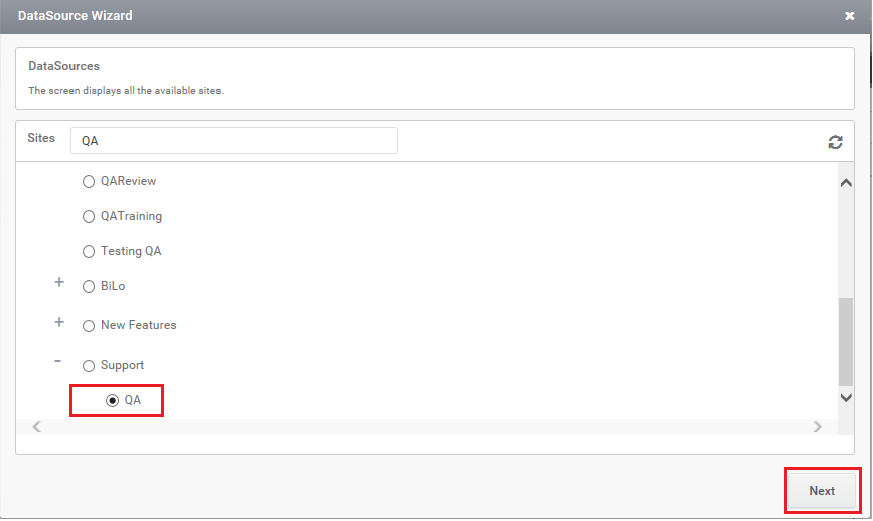
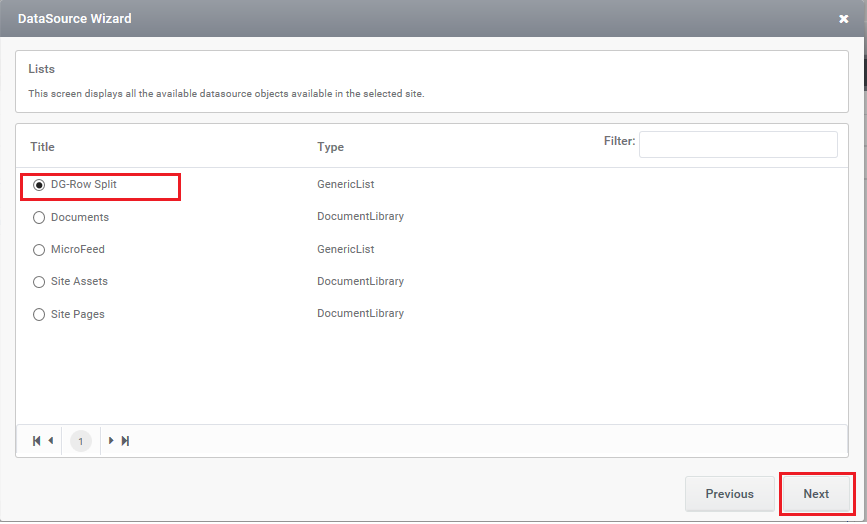
Step 6: Click on the ‘Ok’ Button (Figure 6) and select the ‘Site’ (Figure 7) and the ‘List’ (Figure 8) from the ‘DynamicGrid Configuration’ window.
Figure 7Figure 8
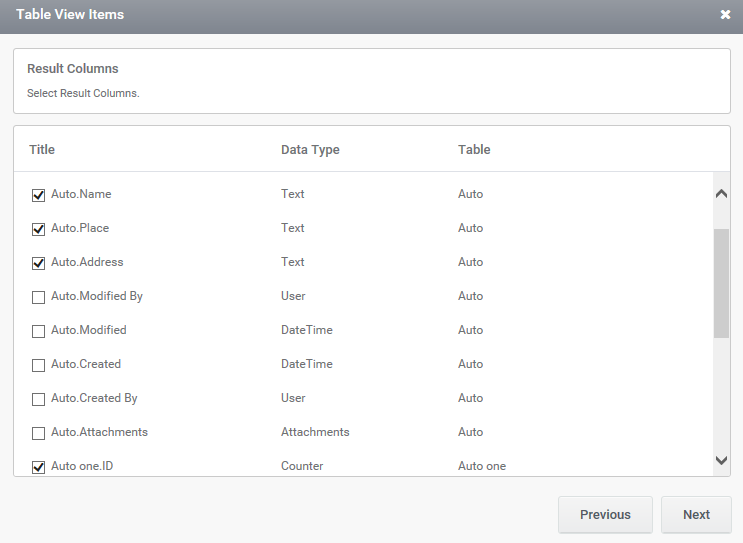
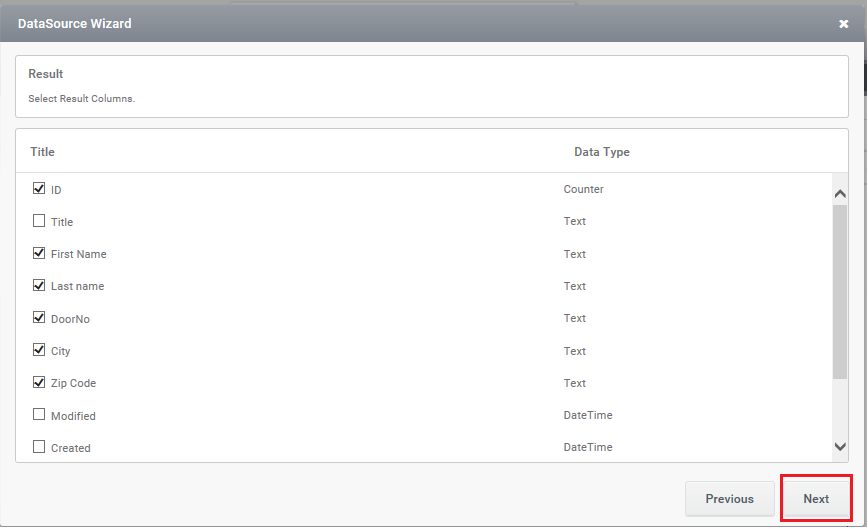
Step 7: Select result columns from the list.
Figure 9
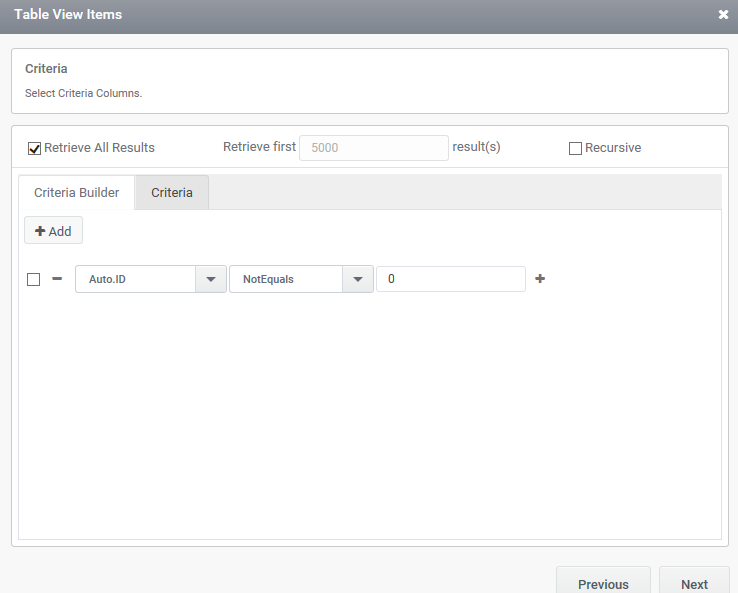
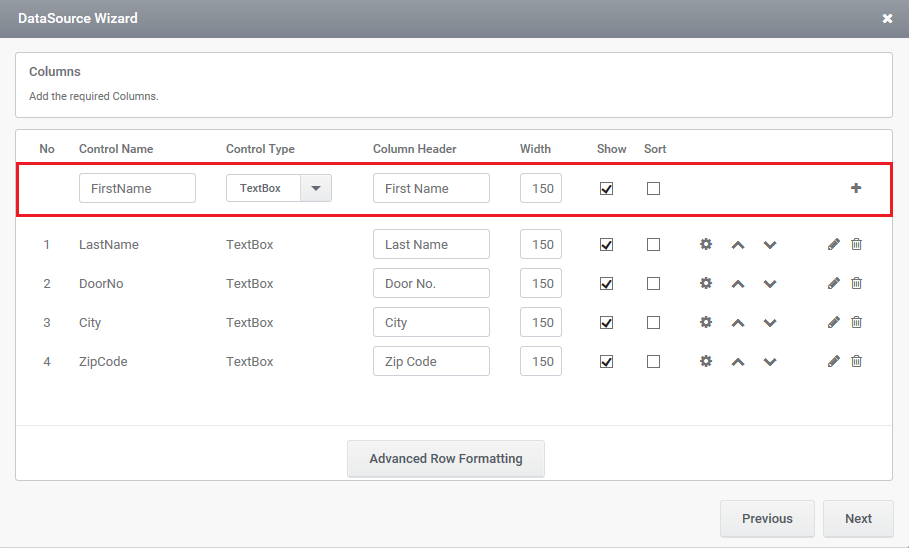
Step 8: Add the required columns by entering the respective fields and click the ‘+’ symbol in the ‘DynamicGrid Configuration’ window. Later click on the ‘Next’ button.
Figure 10
Dynamic Grid – Row split
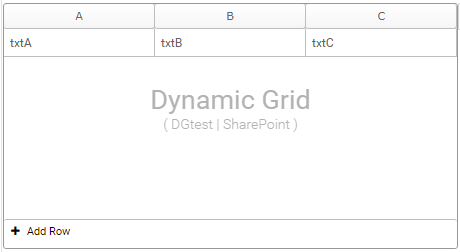
The basic difference between the Dynamic Grid and the new feature, Dynamic Grid – Row Split is an enhanced view of Data entered into the grid.
Below given Preview (Figure 11) is achieved through an advanced row formatting feature which is an added feature in the version, which is explained from Step 7.
Figure 11
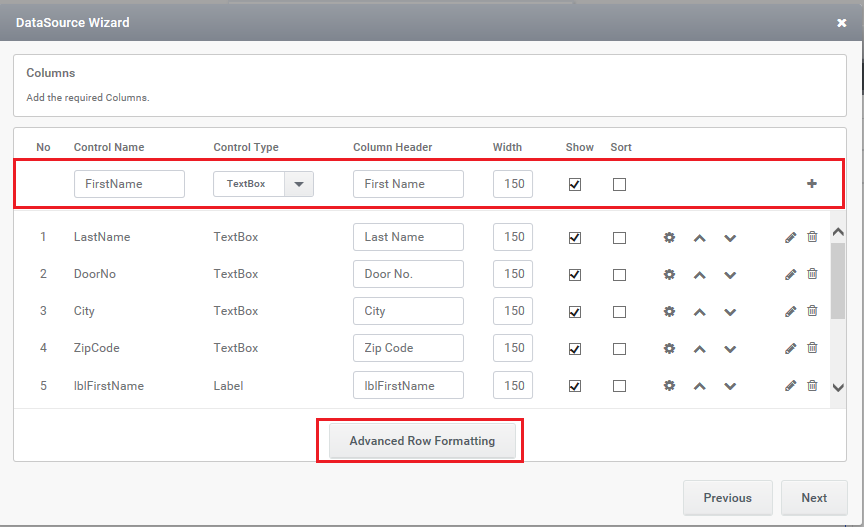
Step 9: Select ‘Advanced Row Formatting’ button in the ‘DynamicGrid Configuration’ window so that the DG- Row split can be implemented.
Figure 12
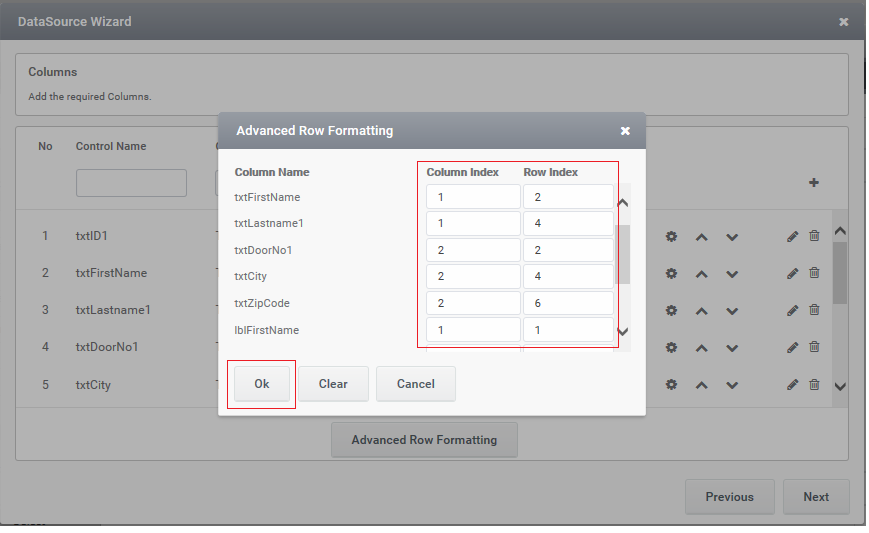
Step 10: The data inside the Dynamic Grid can be re-arranged as per the user’s convenience based on the numbers entered into the column index and row index. As seen in the below example, the preview is achieved by entering the values 1 and 1 in both the column and row index respectively so that the data is positioned in the left-topmost cell of the table. Thereby in-order to enter a value in the leftmost 2nd cell of a table, the value is entered in a format of 1st column and 2nd row. Thus the formats continue and later click on the ‘Ok’ button.
Figure 13
Command Configuration
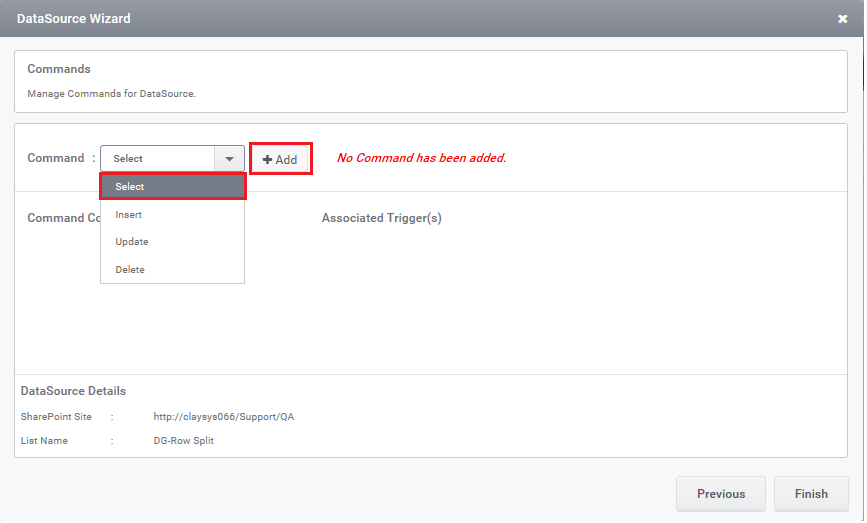
The necessary commands (Select, Insert, Update and Delete) can be configured in the Dynamic Grid – Row Split.
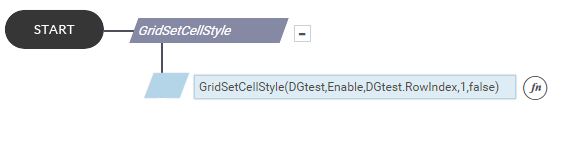
Step 11: Here, in the below given scenario, the commands, Select and Insert are configured. After Step 9, in the ‘DynamicGrid Configuration’ window opt the command ‘Select’ from the combo box and click on the ‘Add’ button.
Figure 14
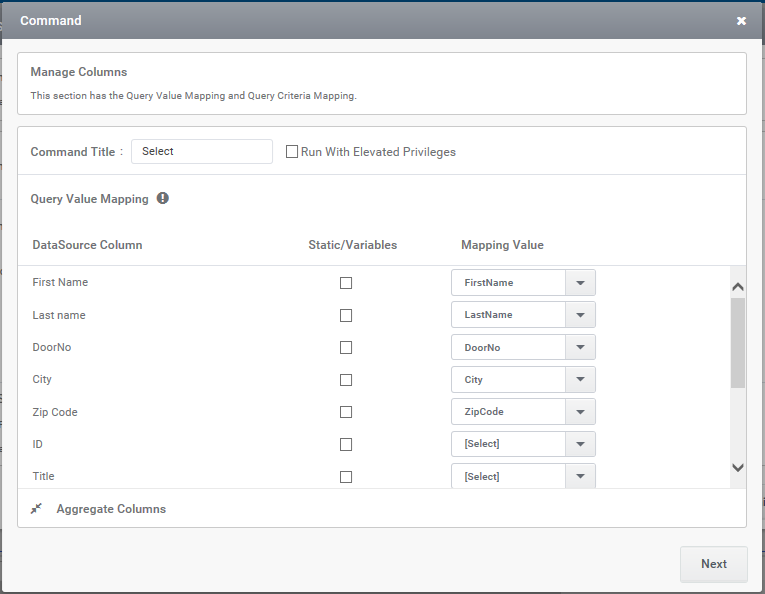
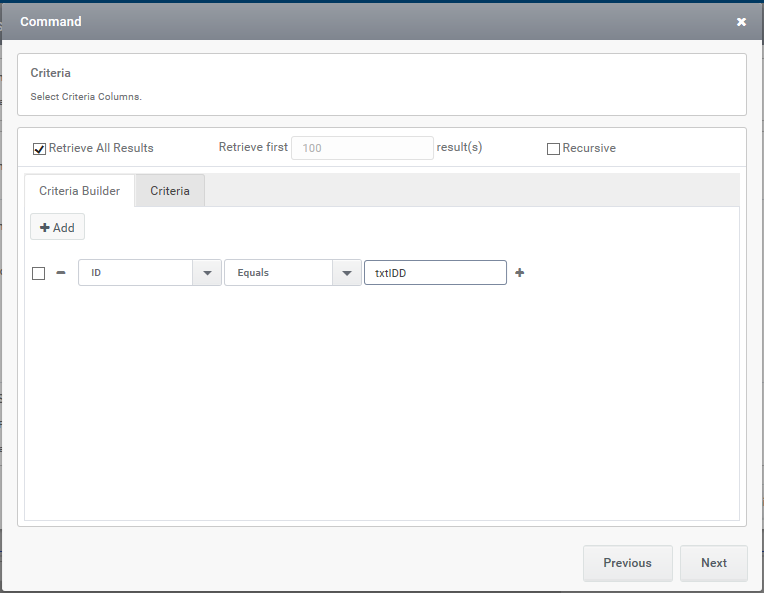
Step 12: In the appeared window (‘SharePoint Commands’), map the columns to the control and here ‘tid’ is used in the criteria part to take all values that are equal to the value that is given in the text box ‘txtIDD’ and then click ‘Ok’ button.
Figure 15Figure 16
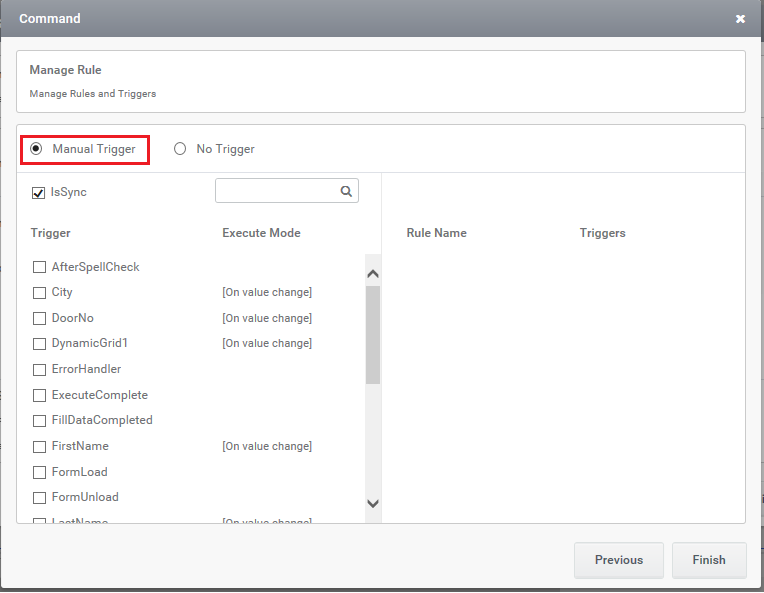
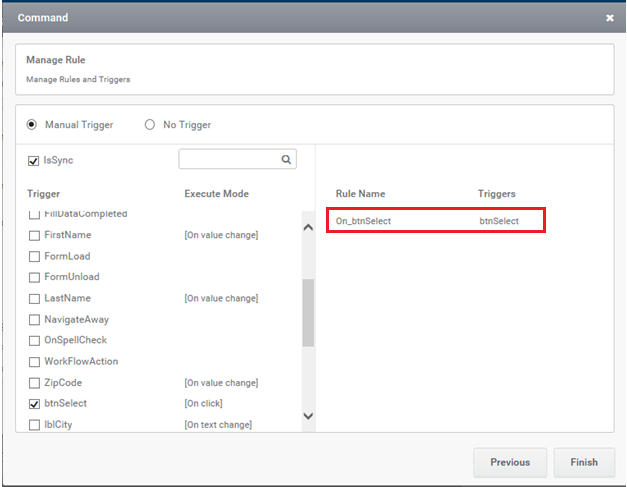
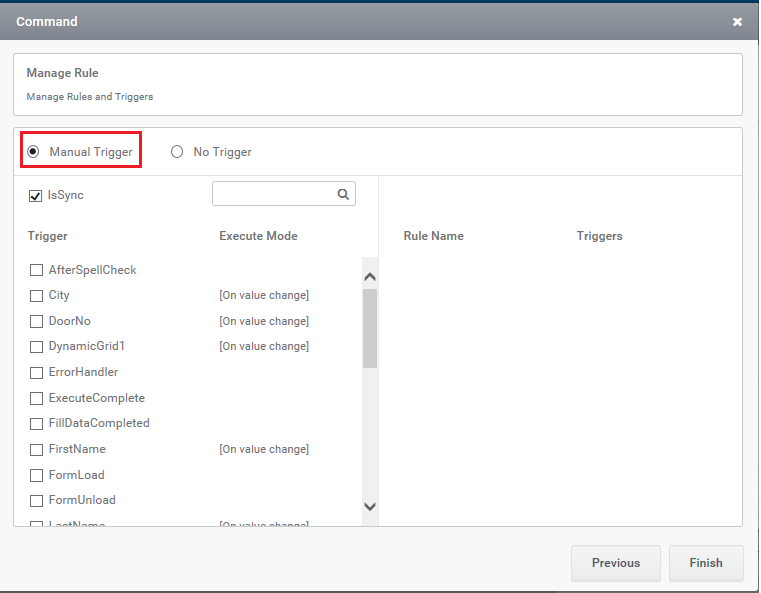
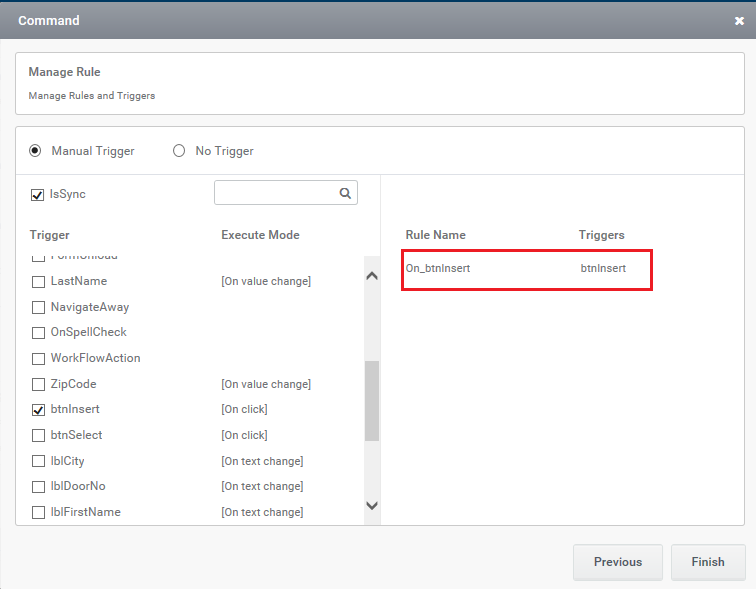
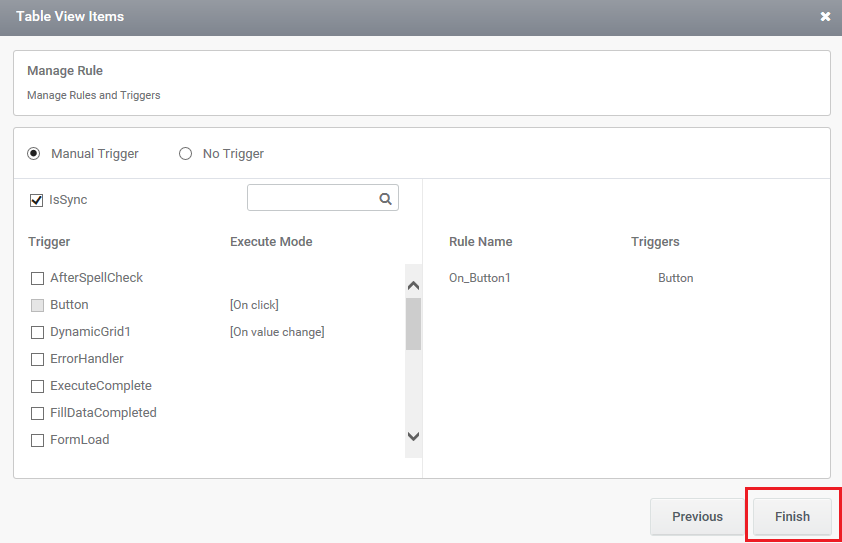
Step 13: After mapping the columns, click on the button ‘Manual trigger’ to set the trigger and as shown in figure 17, associated rule will be created and rule name will be displayed in the right side (figure 18).
Figure 17Figure 18
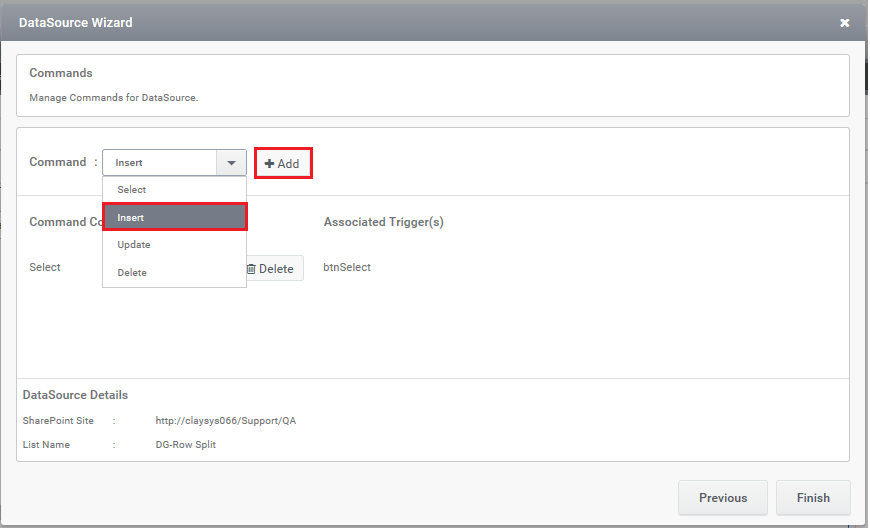
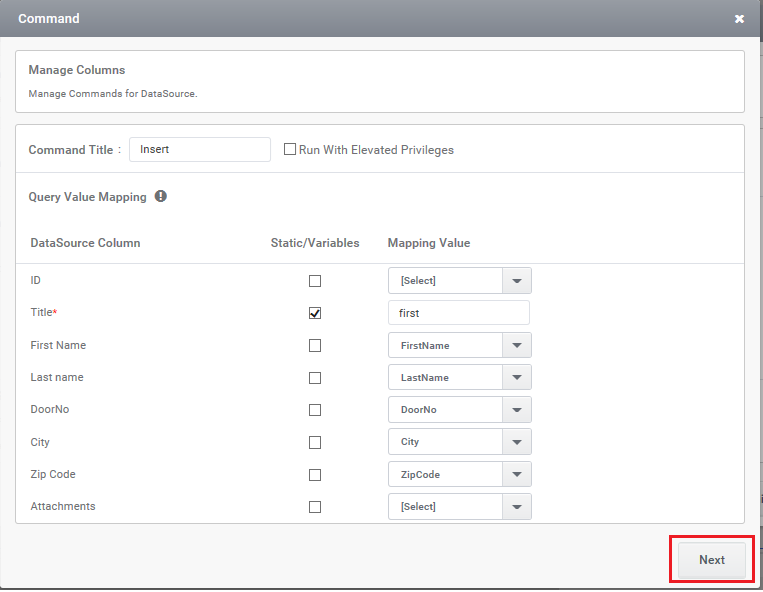
Step 14: Later (if required) opt the command ‘Insert’ from the combo box and click on the ‘Add’ button and as shown in figure 19,in the appeared window (‘SharePoint Commands’) map the columns to the control and click on the ‘Ok’ button.
Figure 19Figure 20
Step 15: After mapping the columns, click on the button ‘Manual trigger’ to set the trigger and as shown in figure 21, associated rule will be created and rule name will be displayed in the right side (figure 22).
Figure 21Figure 22
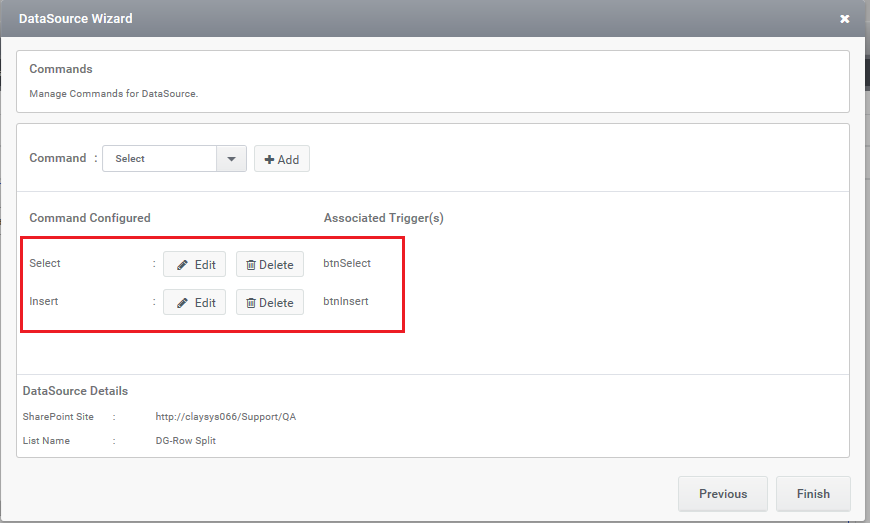
Step 16: In the ‘DynamicGrid Configuration’ window the configured commands will be listed below the ‘Command Configured’ section. After completing all the necessary command configuration (Update and delete if required), click on the ‘Finish’ button.
Figure 23
Output
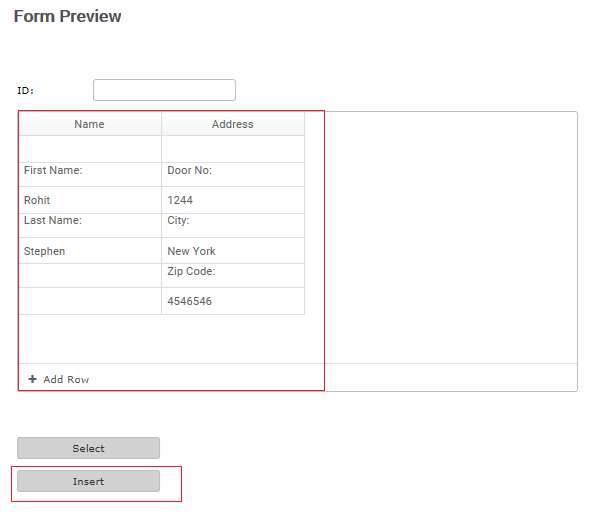
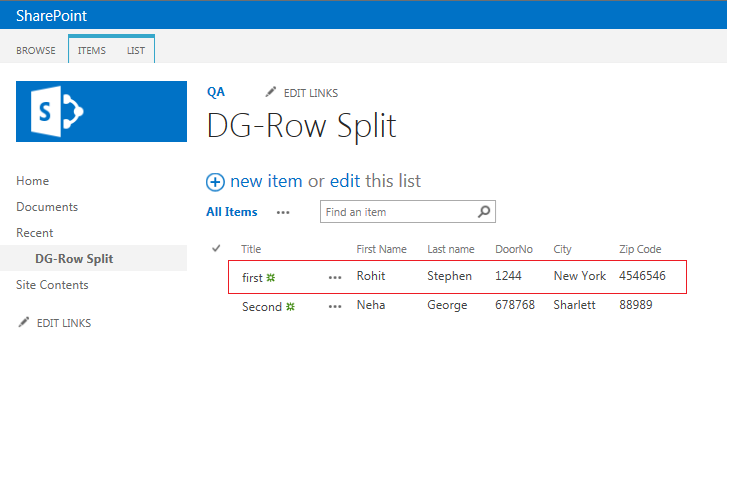
Step 17:In figure 24, on clicking the button ‘Insert’ configured for Insert command enable the user to insert the values into the list/table (Figure 25)
Figure 24Figure 25
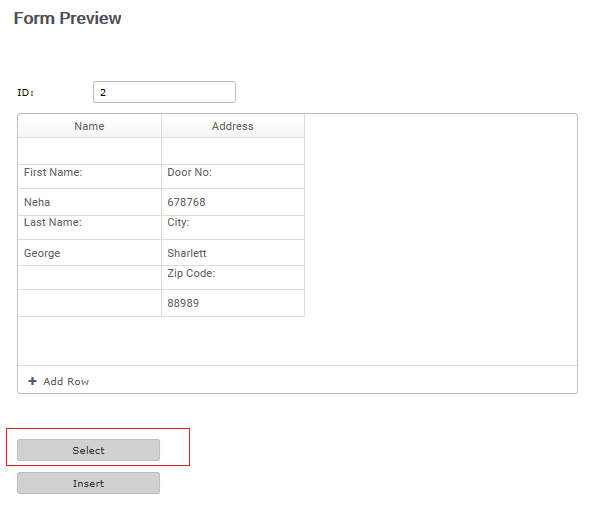
Step 18: In figure 26, on clicking the button ‘Select’ configured for Select command, enable the user to view or select the values from the list (Figure 27), based on the given ‘ID’ in the Form.
Figure 26Figure 27
Conclusion
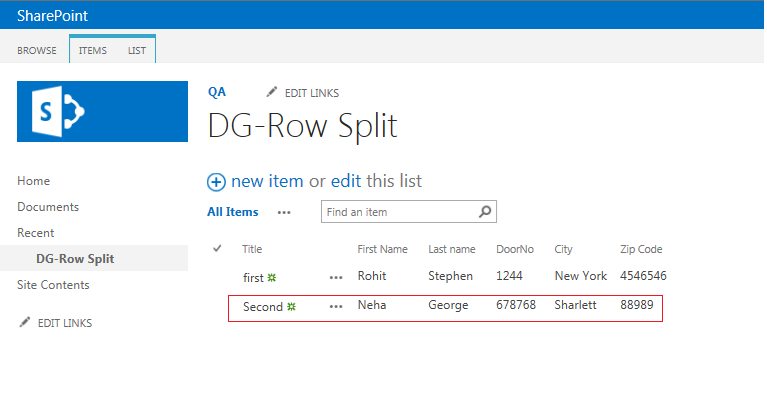
Below given figures shows the Dynamic Grid and also the Dynamic Grid after implementing the new feature, Dynamic Grid – Row Split, respectively.
SEARCH CONTROL WITH WEBSERVICE (ASMX) AS DATASOURCE
Configure Search Control with Web Service:
Drag and drop a Search control from the toolbox.
Select the data source for Search control either through ‘Quick Menu’ or ‘Properties’ window.
Select the data source as ‘Web Service’ from the drop down ‘Data Source Type’ and click on ‘Items’ from Properties window in order to proceed with the configuration.
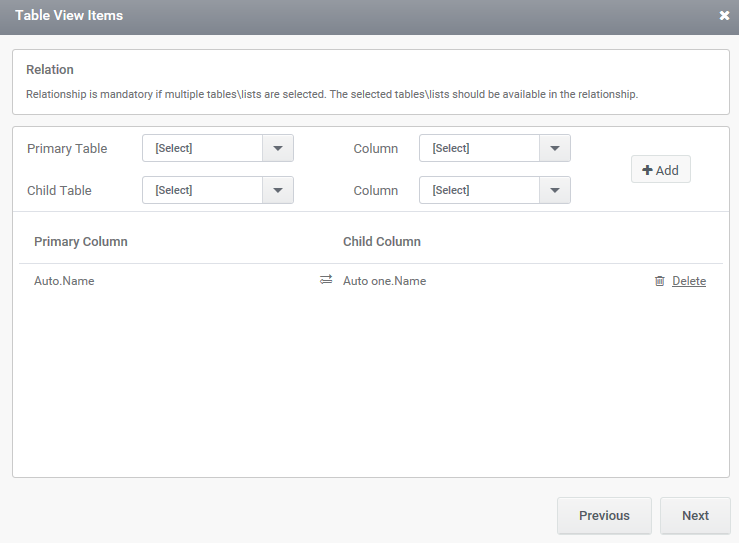
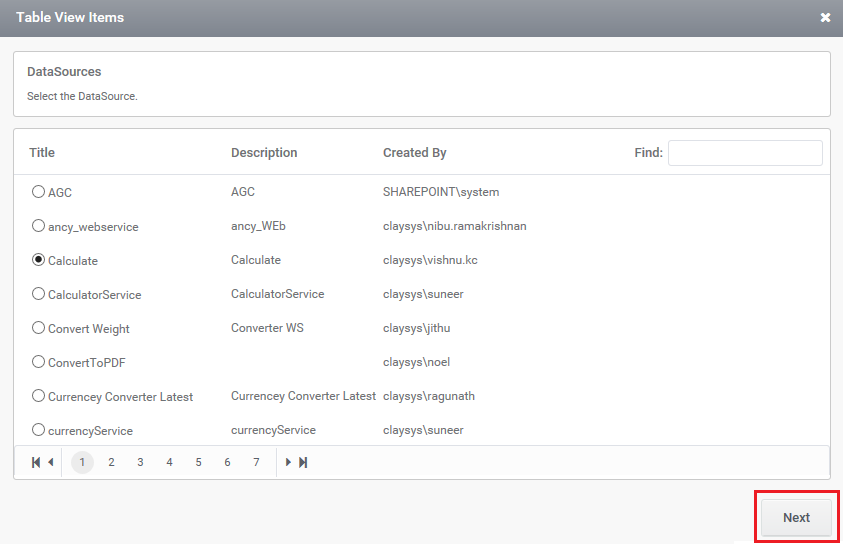
2,‘Table View Items’ window.
Select a web service data source from ‘Data Source’ wizard.
Click on the ‘Next’ button in order to continue with the wizard.
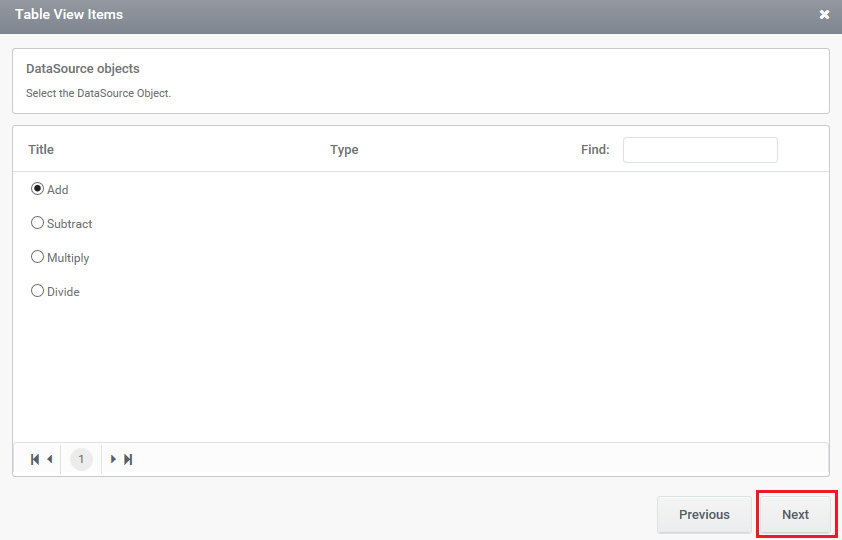
3, ‘Data Source objects’ wizard.
This window lists out all the web service methods from which any one of the method can be selected that have to be configured with the TableView control.
Click on the ‘Next’ button to proceed.
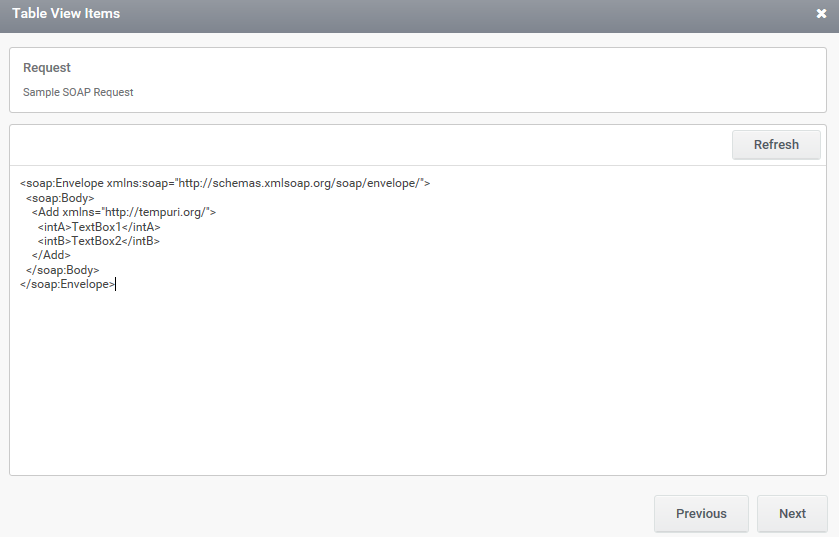
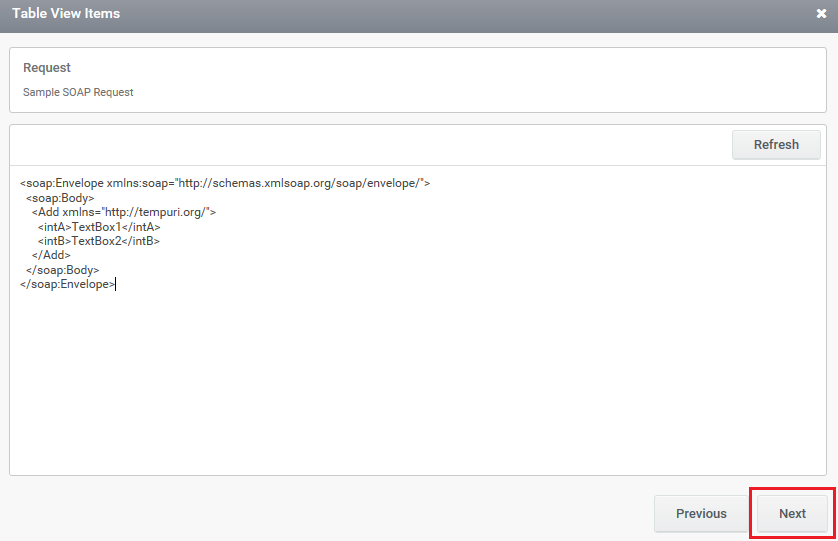
4, ‘Request XML’ wizard will be shown
The Request XML for the web service will be displayed. User can view the Request XML displayed.
5, Click on ‘Next’ button to proceed with the configuration wizard.
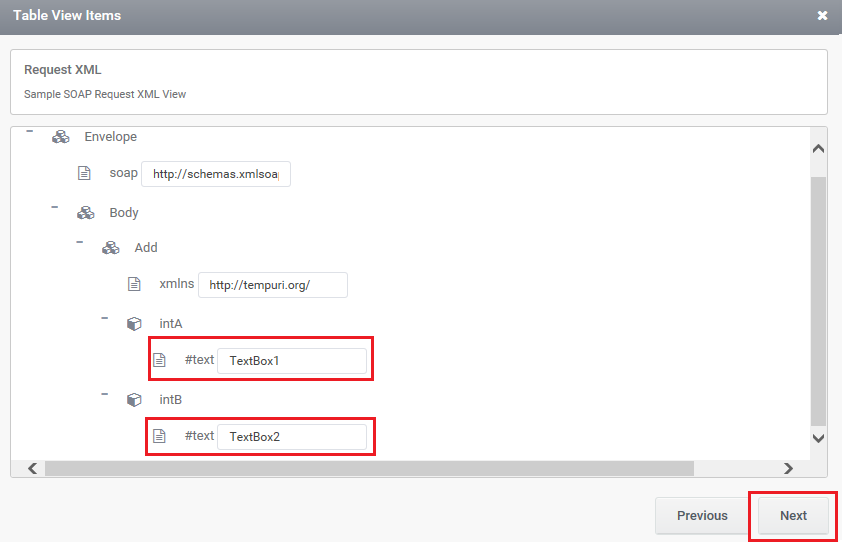
User can configure the input nodes either with static values or with the controls configured in the form.
These configured input nodes will get transmitted along with the request.
Click next Button.
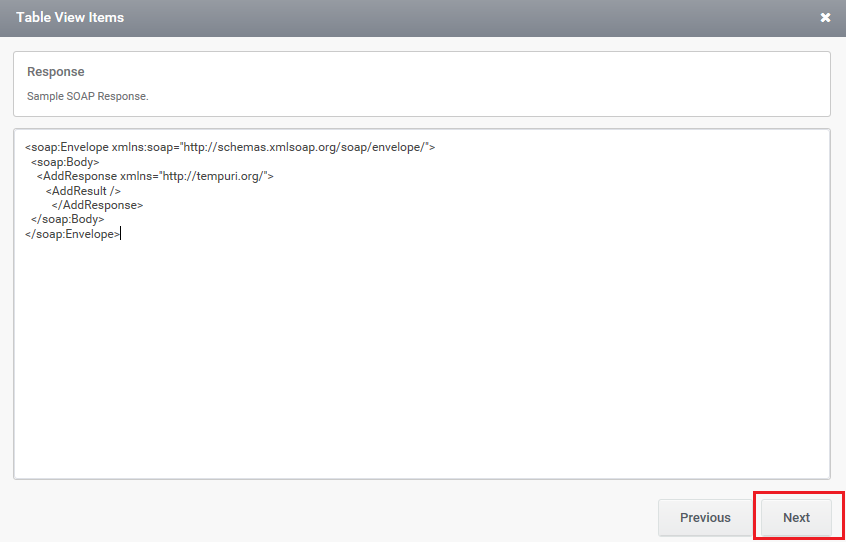
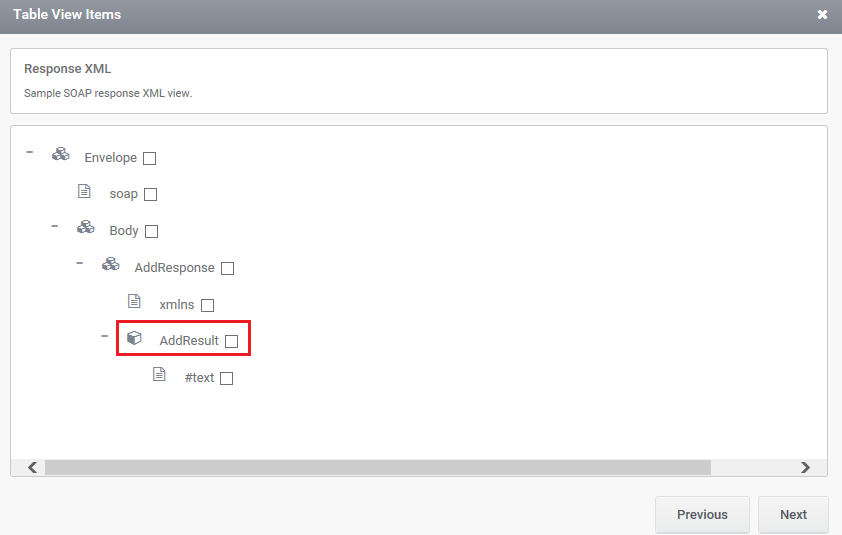
6‘Response XML’ wizard will be shown.
User can select the output nodes that have to be appeared as the resultant columns in Search control.
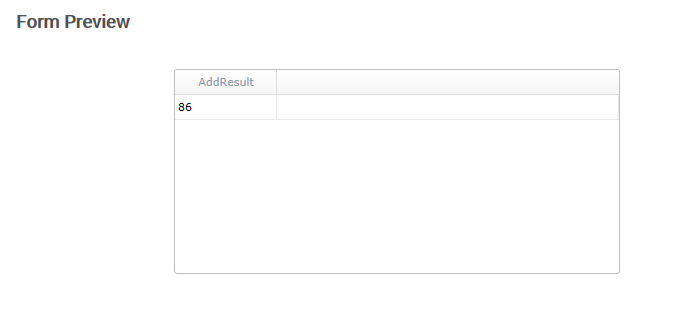
By default, starter will be set to be root note of the ‘Response XML’ (For the below shown Response XML, the root node will be set as ‘Envelope’.).
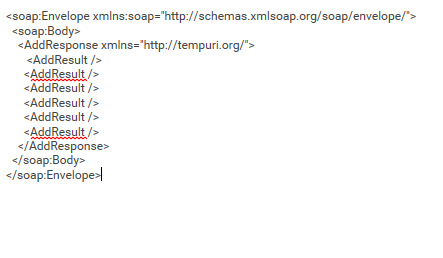
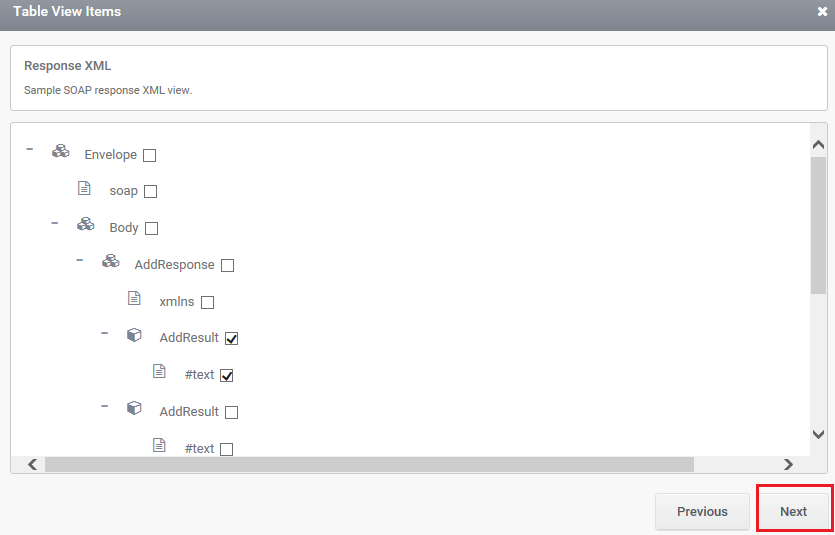
If there are multiple resultant nodes in Response XML that has to be displayed as different rows in Search control as shown below ( Here the node named ‘AddResult’ will be considered as one of the resultant row in Search. Likewise each ‘AddResult’’ node will be considered as each row in Search control).
When Search control is loaded with multiple rows, user has to manually change the starter as the parent node of the selected resultant nodes (Here starter node will be ‘AddResult’).
Click on ‘Next’ button to continue.
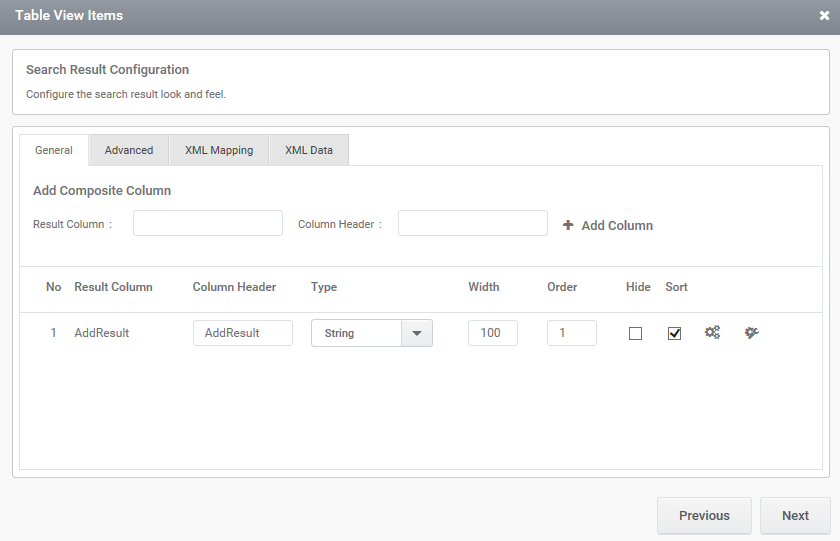
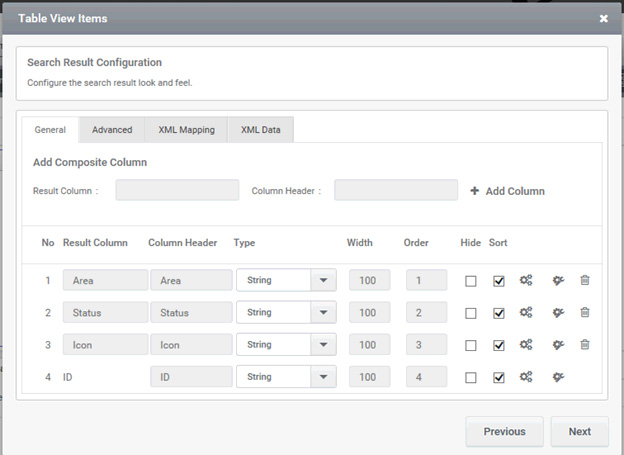
7 ‘Search Result Configuration’ wizard gets open up.
Look and feel of the resultant columns for Search control can be managed in this wizard.
General Tab
All the output nodes selected can be viewed as the resultant columns.
User can change the look and feel of these columns.
Trigger to fill the control can also be managed here using ‘Add Trigger’ button.
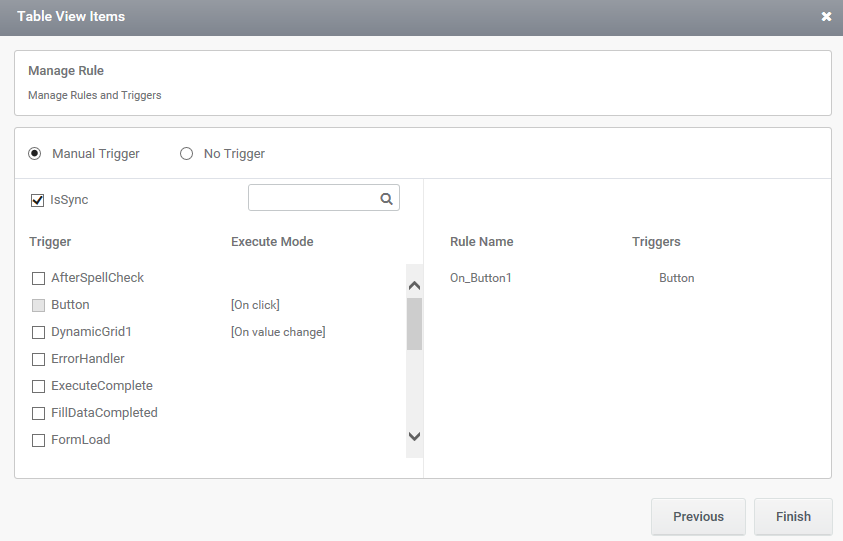
On clicking ‘Next’ button, a ‘Manage Rule’ window will Open.
Manage the FillData command as ‘Sync’ and ‘A-sync’.
Manage the trigger on which the control has to be loaded in preview.
View the FillData commands associated with the same control under section ‘Associated Rules’.
Now a rule to fill the control will be automatically generated in Rules Engine under the selected trigger.
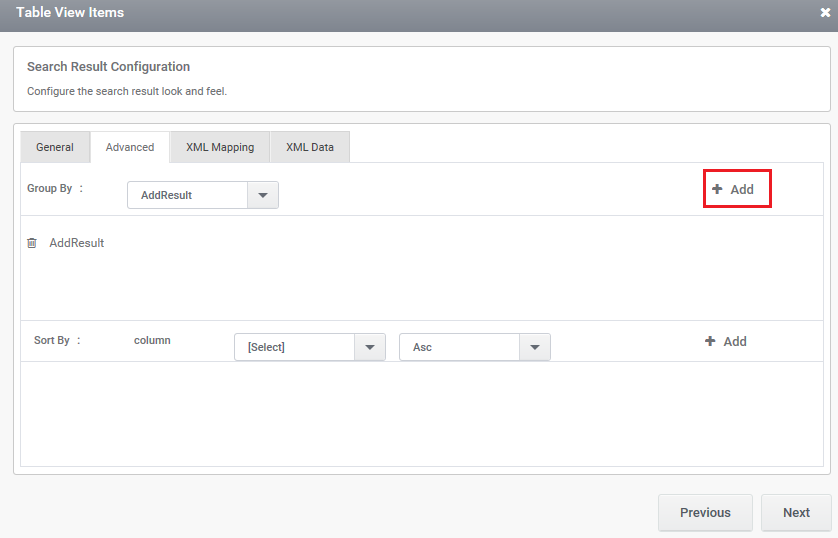
2 Advanced Tab
Sort order of the resultant columns can be managed.
Select the column name from the drop down ‘Column’ based on which the sorting has to be done.
The ‘Ascending’ or ‘Descending’ order can be selected from the nearby drop down.
Click on button ‘Add’.
Now the selected column will get added.
Group order for the resultant columns can be also managed in this tab.
Select the column name from the drop down ‘Column’ based on which the grouping has to be done.
Click on button ‘Add’.
Now the selected column will be added.
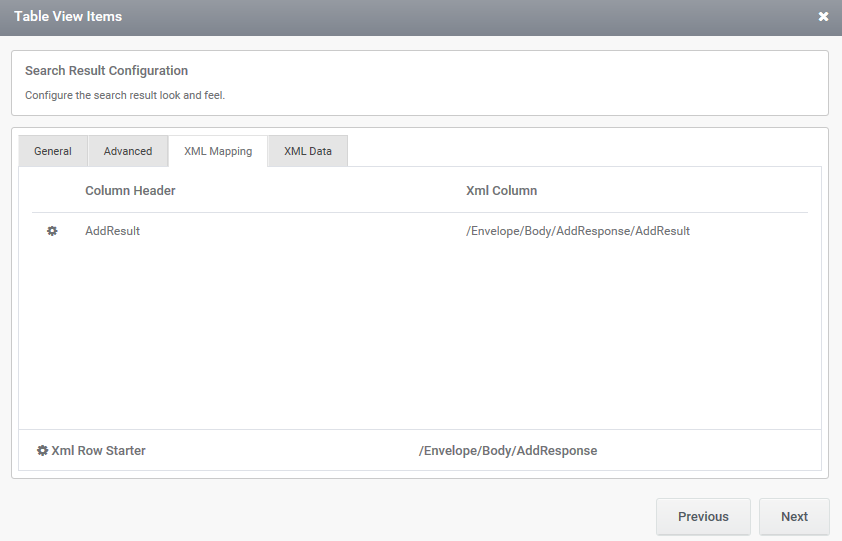
3 XML Mapping
The resultant columns of the Search control gets mapped to the XML nodes automatically.
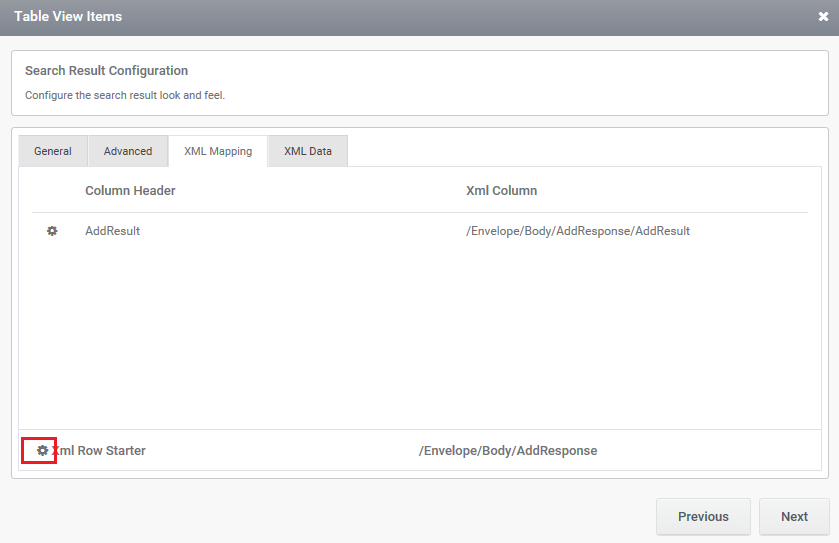
XML Row Starter
Click on button in the wizard ‘Search Result Configuration’ to change the XML Row Starter.
A window ‘ConfigureXMLWindow’ gets pop up.
By default, XML Row Starter will be set to the root node of the Response XML which is displayed in ‘XMLPath’.
In order to populate the Search control with multiple rows, the ‘XML Row Starter ‘has to be set as the parent node of the resultant nodes (Here ‘AddResult’ will be the parent node).
Now the ‘XMLPath’ will be automatically changed to the path of the newly selected starter node.
Click on button ‘OK’ to proceed.
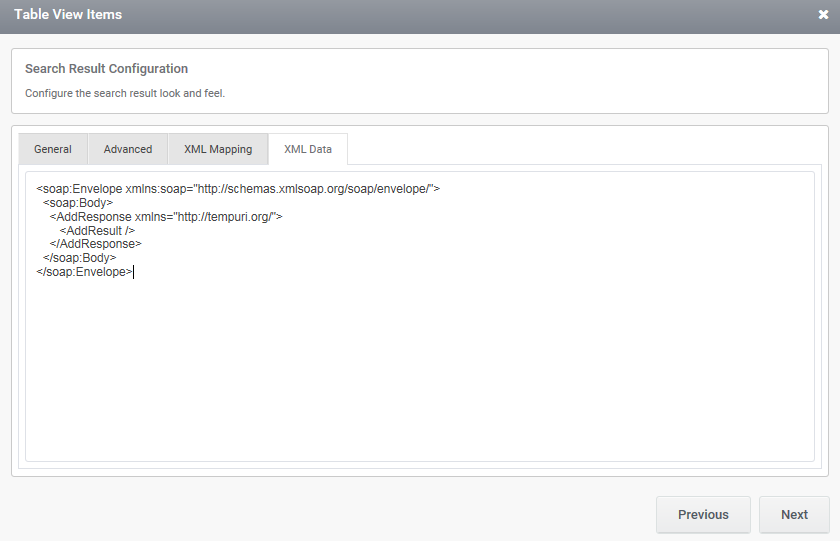
4, XML Data
Response XML for selected web service method can be viewed.
5, Click on ‘Finish’ button to save the configuration of Search control with web service.
In Preview,
Search control gets populated with single row based on the Response XML.
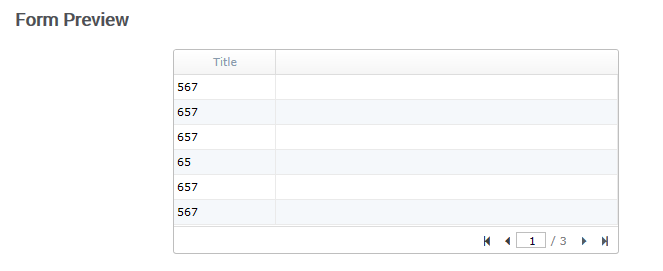
Search control gets populated with multiple rows based on the Response XML.
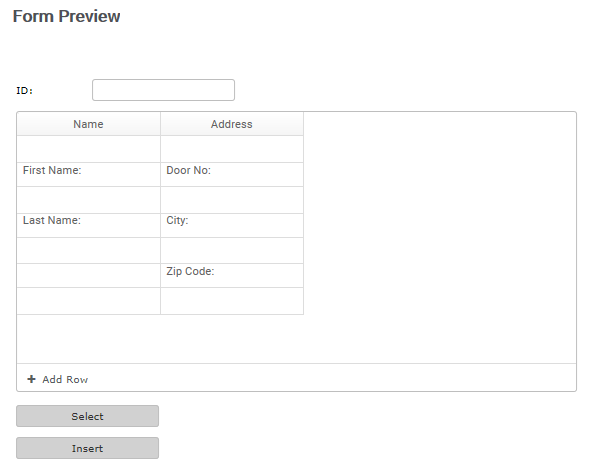
Navigation from DynamicGrid from One Form to another Using HyperLink
Form A Configuration
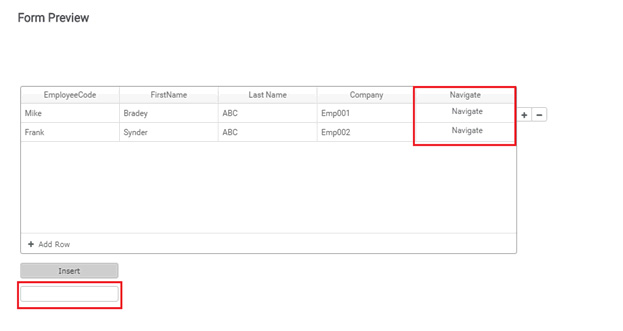
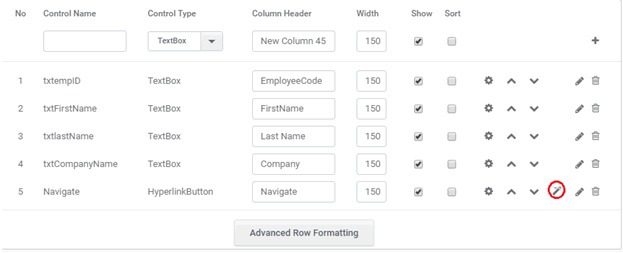
Insert a Hyperlink in the Dynamic Grid control and a TextBox control in the form as shown below.
Configure the hyperlink as shown below,
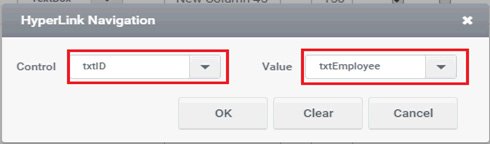
Click on the button which is marked red in the image below to map values to the hyperlink.
A popup window will be displayed which allow the user to map the value to a specific control. Here as per the sample form we are passing the Employee code to the Text Box in the form.
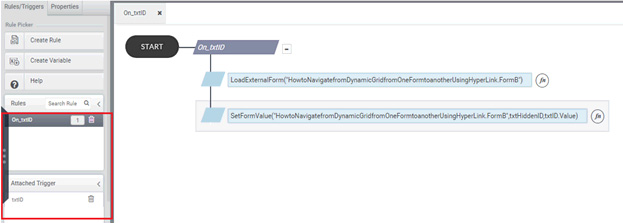
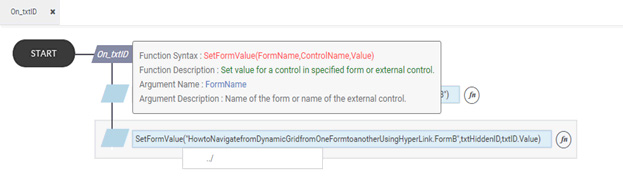
In the trigger of this text box add a rule as shown below. Here we are Loading the FormB using LoadForm ( ) function, and passing the employee code to FormB using SetFormValue ( ) function.
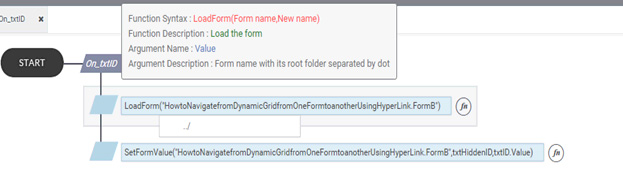
Syntax for LoadForm ( )
Syntax for SetFormValue ( )
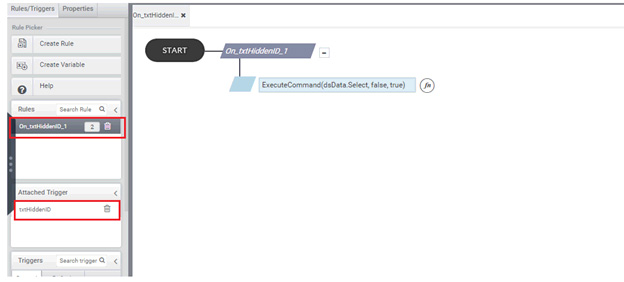
Here txtHiddenID is the control name in FormB.
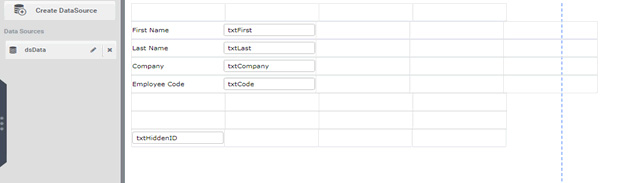
FormB Configuration
We have a sample form ‘FormB’ as shown above. Here we are selecting a particular employee based on the Hyperlink value passed from ‘FormA’.
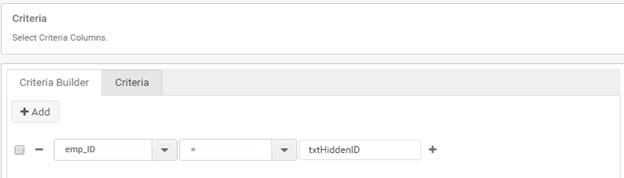
Configure the Form DataSource as shown below.
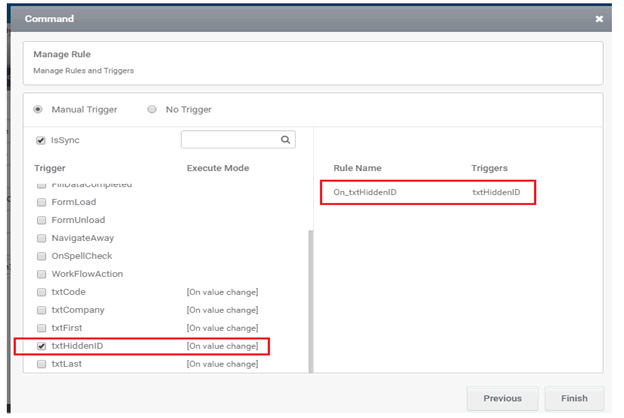
And for this DataSource add the trigger as the Text Box where the hyperlink value is passed and a rule will be created as shown below,
Note: SetFormValue ( ) function is not applicable in preview.
Aggregate functions perform a calculation on a set of values and return a single value. Except for ‘COUNT’, aggregate functions ignore all null values. All these functions are deterministic; hence they return the same value any time whenever called by using a specific set of input values.
In ClaySys AppForms, aggregate functions are available when a FormDataSource control is configured with SharePoint List. It helps the user in the consolidation of data in the list.
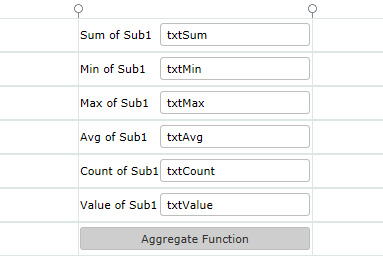
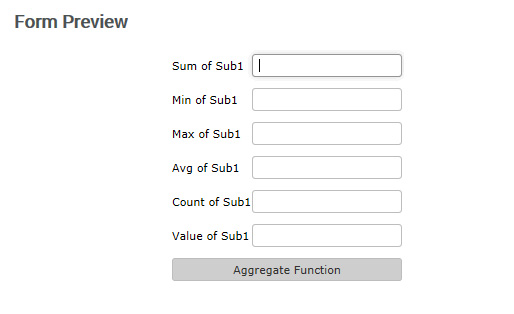
Create a form to implement Aggregate Function as shown below.
Designer
Preview
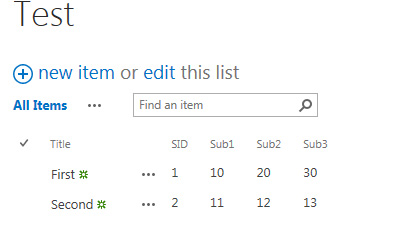
2. Create a list with respect to the form created. [Below given is the sample list of the form illustrated above]. 3. Add values into the list.
4) Click on ‘Create DataSource’ in the AppForms window.
Select the corresponding list from the ‘Available Sites’ and ‘Available Lists’.
Click on the ‘Select’ option and then click on ‘Add’ button in the’ DataSource’ window.
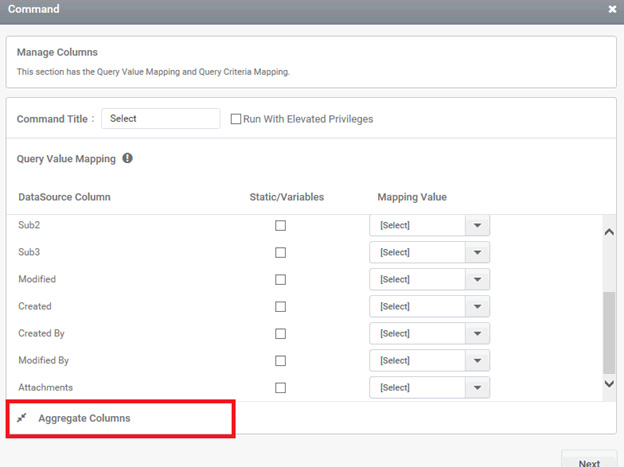
‘SharePoint Commands’ window gets open up.
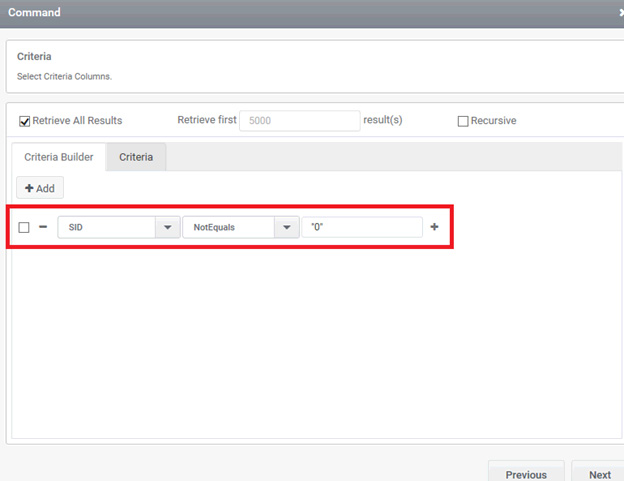
In this window, specify the criteria in ‘Query Criteria Mapping’ session that based on which the data should be generated in the Preview.
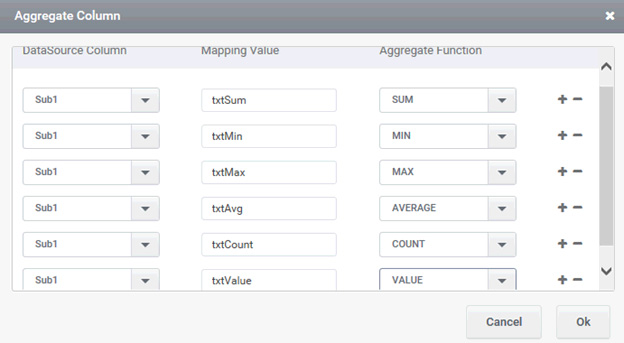
After that, click on the ‘Aggregate Column’ button in order to configure the aggregate functions with form data source.
List of aggregate function available in AppForms
Sum :- This function will retrieve the sum of all values in a selected column.
Min :- This function will retrieve the minimum of all values in a selected column.
Max :- This function will retrieve the maximum of all values in a selected column.
Average: – This function will retrieve the average of values in a selected column.
Count :- This function will retrieve the number of values in a selected column.
Value :- This function will retrieve the value of the last row of a selected column.
Select the column name in the list, the text box name to which the value has to be viewed and the required aggregate function under the DataSource Column, Mapping value and Aggregate Function respectively, in the ‘Aggregate Column’ window.
Click on the ‘Save’ button.
Later click ‘Ok’ button in the ‘SharePoint Command ‘window.
After that, add the trigger and then click ‘Finish’ button.
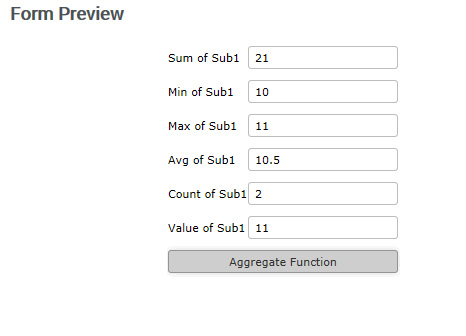
5 On the ‘PreviewForm’, click on the button, that is triggered and the result can be viewed in the text box.
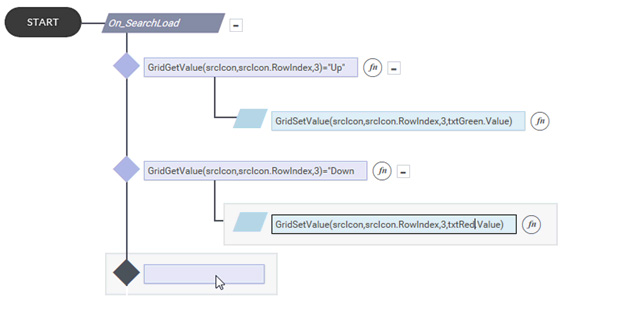
How to skip criteria when the data is empty in search Control?
Steps:
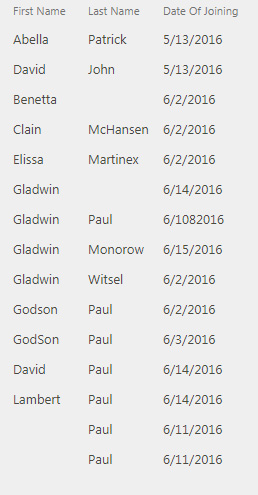
Create a custom list. Here we are demonstrating this example with a list having columns to enter the First Name, Last Name, and Date of Joining.
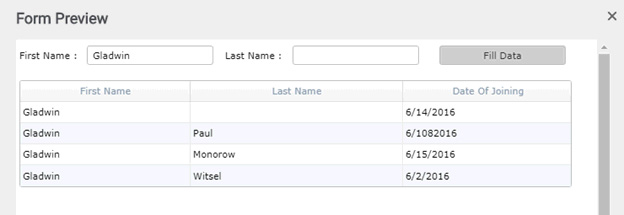
You can notice that there are multiple names, either with a first name and last name or a first name or a last name.
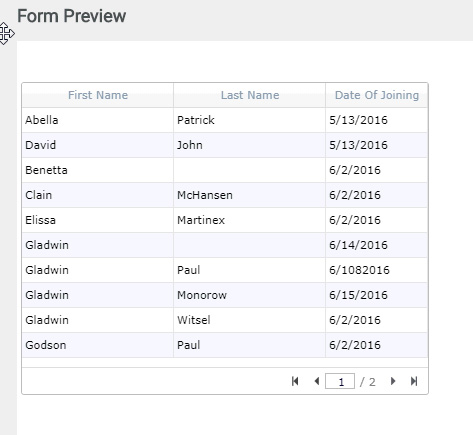
Insert a search control in the form and configure the search control, so that it lists all the data in the Custom List.
Now consider the user want to display all the data according to a specific input, in such a situation search can be configured as,
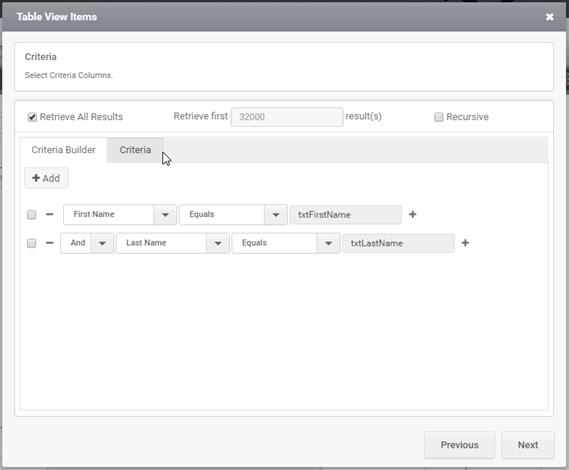
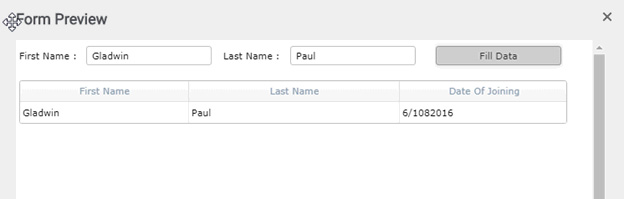
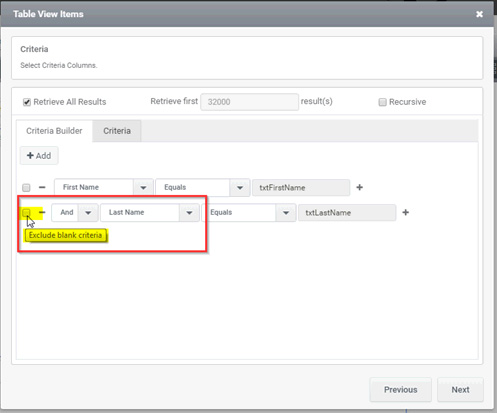
Now if the user needs to search based on the value he entered, (I.e. if only First Name is entered, then should get all the record based on that. No need to consider Last Name), he can implement such functionality as shown below.
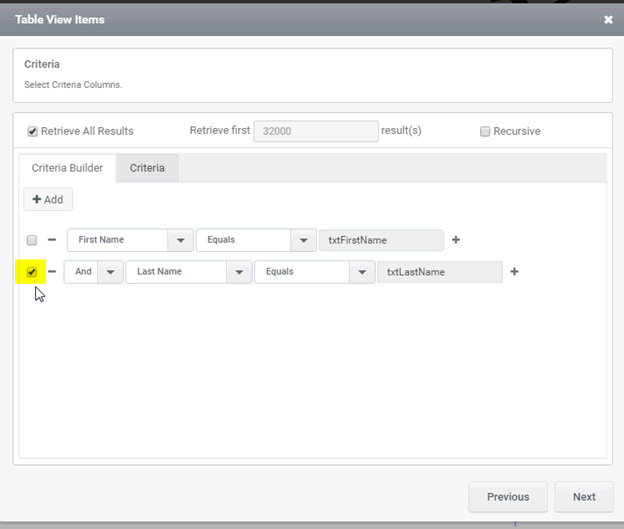
Check the criteria you want to exclude, here we checked the Last Name so that whatever be the condition in the Last Name, even if it’s null, all the First Names will be listed.