Push Notification
Push notifications are messages that pop up on a user’s mobile phone or desktop device via their chosen web browser. A user can send notifications to another user within the same tenant through PushNotification rule by providing the parameter values.
The feature will allow sending push notification using Signal R technology. SignalR is a free and open-source software library for Microsoft ASP.NET that allows server code to send asynchronous notifications to client-side web applications. Without refreshing the web page, the server code pushes content to connected clients as soon as it becomes available. This helps the user to avail live data without refreshing the page.
Notification Sending Methods
The notifications can be send via two methods – Via Rule and API.
- Rule
In this method, the user can create a form with the rule PushNotification with the required trigger.
The trigger can be any control trigger or the default triggers. Once the form is created, the user can render it and send notifications to any user/group within the tenant.
The syntax of the rule is

Fig 1: Syntax of PushNotification Rule
The parameters for the rule are AssignedTo, Message, Title, Icon and HideFromNavigation.
Theparameters other than “AssignedTo” and “Message” are optional.
The argument type and description of various parameters are explained below.


Fig 2: Parameter Details of PushNotification Rule
- API
An API function can be used initiate a notification from an external source. API notifications can be send to any user/group using tools like Postman. We can send use the XML/Json body. Following are the URLs to be provided while sending notifications via Postman.
Token based Authentication type: https://xyz.org/forms/api/v2/notification/notify
Basic Auth Authentication type: https://xyz.org /forms/api/notification/notify
where, https://xyz.org is site URL where the notification needs to be received.
In Forms authentication site, only Token Based Authentication type will work.
In Windows authentication site, only Basic Auth Authentication type will work.
The XML API Request Template that is to be provided while sending notifications via Postman is given below. The order of the tags can be changed according to the requirement, but it should be in the ascending order (i.e., HideFromNavigation should be always after AssignedTo).
<APINotificationRequest
xmlns=”http://schemas.datacontract.org/2004/07/ClaySys.AppForms.Model.Models”
xmlns:i=”http://www.w3.org/2001/XMLSchema-instance”>
<AssignedTo>everyone</AssignedTo>
<CustomData>{‘id’:1212, ‘Tenant’:’default’,’Name’:’Admin’,’Class’:’testClass’,’Icon2′:’fas fa-bell’}</CustomData>
<HideFromNavigation>false</HideFromNavigation>
<Icon>fas fa-exclamation</Icon>
<Message>Testing API Message</Message>
<TenantId>default</TenantId>
<Title>API XML Test</Title>
</APINotificationRequest>
The JSON API request template given below.
{
“AssignedTo”: “everyone”,
“CustomData”: >{‘id’:1212, ‘Tenant’:’default’,’Name’:’Admin’,’Class’:’testClass’,’Icon2′:’fas fa-bell’}”,
“HideFromNavigation”: “false”,
“Icon”: “fas fa-exclamation”,
“Message”: “Testing API Message”,
“TenantId”: “default”,
“Title”: “API Json test”
}
Before sending a notification via API, add the IP of the connected VPN in the AllowedSingleIPs of Forms.
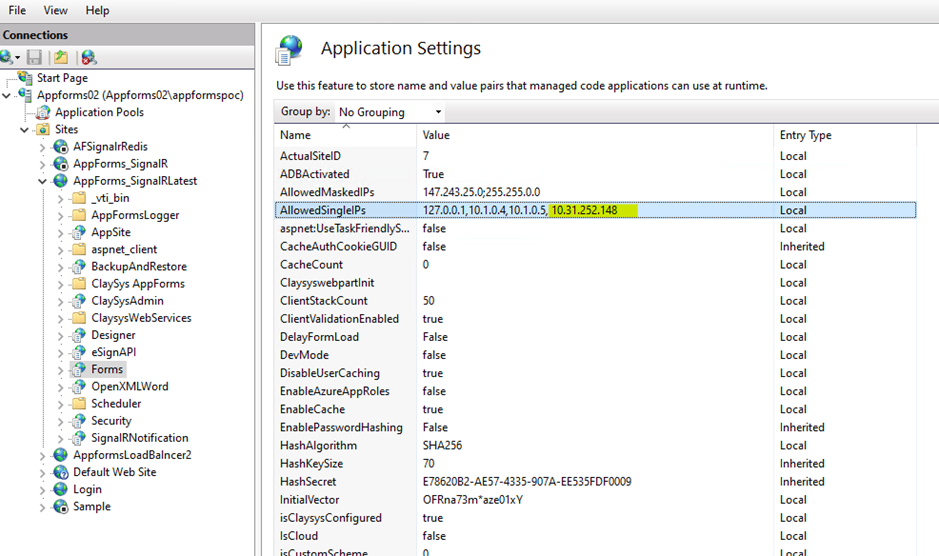
Fig 6: Add the IP in the Application settings of forms
Designer Part
Points to be noted before sending notifications to a user are,
- “Enable Notification Setting” in Beta Version of Tenant Settings.
- “Notification Settings” in Basic Settings of Tenant Settings should be managed by clicking Manage link.
- AppForms Branding should be applied so that global header will be available.

Fig 7: Items in Notification Settings
Following are the properties managed in Notification settings section.
- User notification feature can be enabled tenant wise. The setting will also allow the users to map a form to show all the notifications.
- Number of latest notifications can be managed in Notification Settings from “Maximum Notification Count” section.
- Once all the latest notifications are seen, the alert on the bell icon will be removed. Enabling the option “Enable ‘Remind Me’ Indicator” makes a pin icon available in the notification popup that acts as the “Remind Me” feature, allowing the user to pin a particular notification item highlighted and in the badge count.
- Notification data in the SQL Table will be recorded to a specific duration and after that, the data will be archived to another SQL table. The duration can be specified from the notification settings in “Notification Duration (In Days)”. After saving this value, the “Archive” button should be clicked to archive the notifications. By default (if kept null), the value will be 10.
- “Archive” button helps to archive data from one SQL table to another one. The number of notifications archived is based on the value given in “Notification Duration (In Days)”. This feature is used if the client needs to store the old notifications to a separate database.
- A custom HTML template can be defined for displaying the Notification Item in latest notification section and can be managed in “Notification Item Template”. If kept blank, the default template will be applied.
The default template applied automatically is given below:
<div class=’notify-avatar’>
<i class='{{Icon}}’></i>
</div>
<div class=’notify-info’>
<h5>{{ Title }}</h5>
<p>{{ Message }}</p>
</div>
Fig 8: Default value of Notification Item Template
- A new default trigger is added for notification (like FormLoad, FormUnload etc.), so that the user can perform any logic based on receiving notification in each form. The newly added default trigger is “NotificationReceived”.
- User can map a form for All Notifications page in “All Notification Mapping” section and for each Notification Item from “Notification Item Mapping” section in the Notification Settings. While mapping form for the notification item, user can also get the unique notification ID to the specified control. The specified control should be a textbox or hidden control. If no form is mapped in “All Notification Mapping” section, the default popup will gets loaded.
Notification Configuration for Initiator
Notification can be send to a single (or multiple) user/group or all users in that tenant. User can send notifications with the rule exposed – PushNotification() or by making an API Call, which will be having the parameters for AssignedTo, Message, Title, Icon, HideFromNavigation as explained in the above section.
- Notification to Specified User(s)
In order to send notifications to specified users, the user(s) list should be given in the parameter “AssignedTo” in PushNotification rule as shown below.
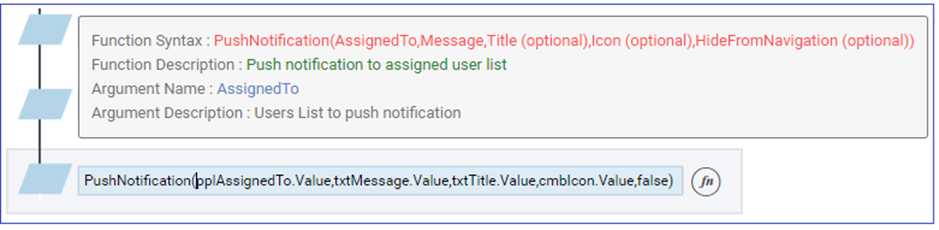
Fig 9: Notification to Specified User(s) – Case 1

Fig 10: Notification to Specified User(s) – Case 2
- Notification to All Users
In order to send notifications to all users in the tenant, the value “Everyone” should be given in the parameter “AssignedTo” in PushNotification rule as shown below.

Fig 11: Notification to All users
In addition to normal visible notifications, the user can send client side notification without showing in the navigation menu by passing the parameter “HideFromNavigation” as “true” in the PushNotification rule as shown below.
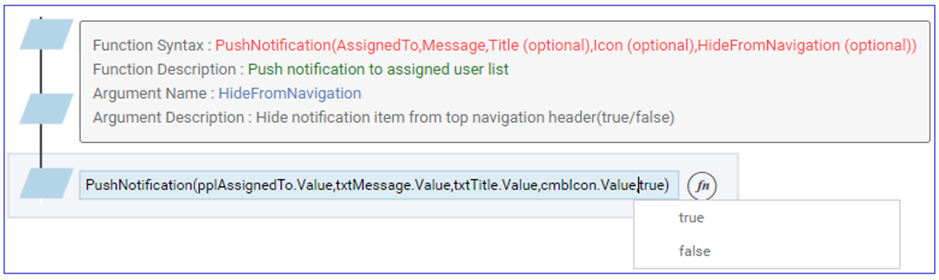
Fig 12: Hidden Notification
This hidden type of notification helps to trigger the “NotificationReceived” trigger helping to apply any business logic.
Notification Configuration for Receiver
In order to receive a notification, the notification bell icon should be enabled by the receiver as mentioned in “Designer Part” section above. When the receiver is using the webpart/workflow dashboard page, he will receive the notification instantly. In case the notification is sent to a user who is presently not logged in, he will receive it once he logged in to the site and the notification will be updated there.
A bell icon with an alert and count will be shown on the global header when the notification is received. Once the user clicks on it, the latest notifications popup will slide down. In addition, a “View All” hyperlink is available at the bottom of the latest notification section.
- The user can view all notifications from the “All Notifications” page/popup or can map a form to show the same.
- The user can delete the notifications from the “All Notifications” page/popup by selecting each item or by selecting all items.
- The user can choose each notification item to remind later using the pin icon.
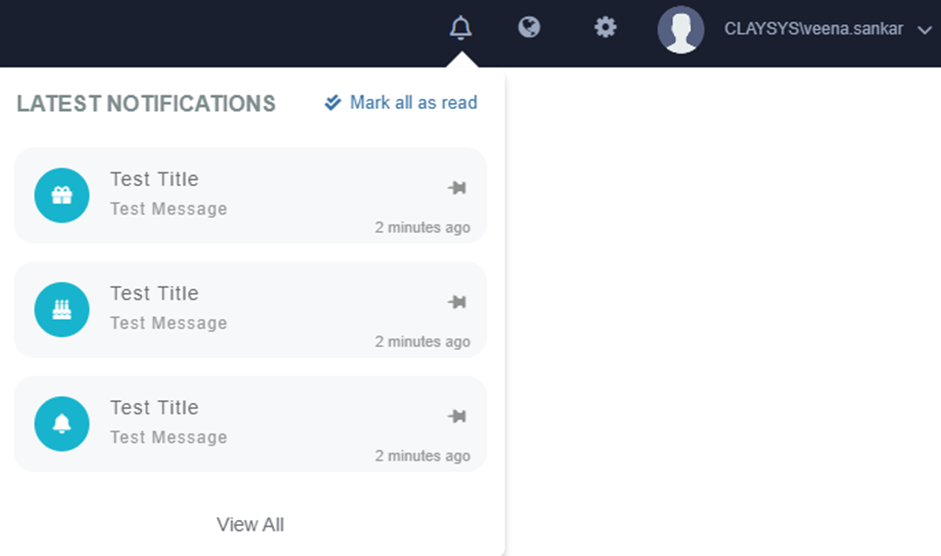
Fig 13: Notification Popup
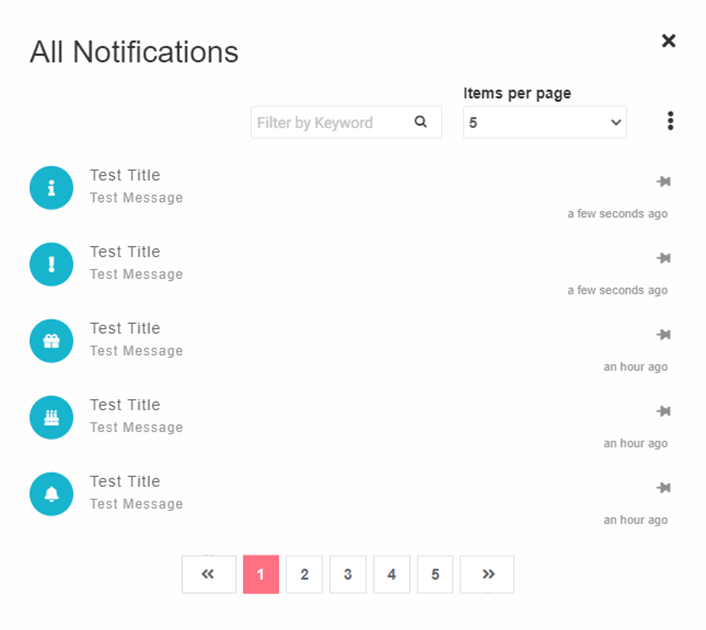
Fig 14: All Notifications Popup

Fig 15: All Notifications Popup with Delete Option
Push Notification for Load Balance Sites
Note: Changes should be moved to all the load-balanced servers.
Step 1:
Adding “NF:username” and “NF:userPass” in the Applications settings of the root site. This user should have designer access.
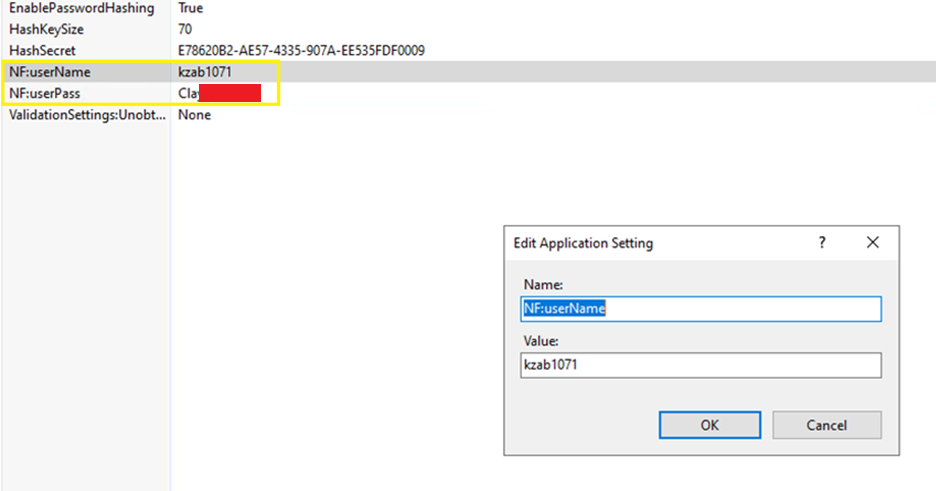
Fig 16: Adding “NF:username” and “NF:userPass”
Step 2:
A separate new binding needs to be added in IIS with the server IP and certificate.
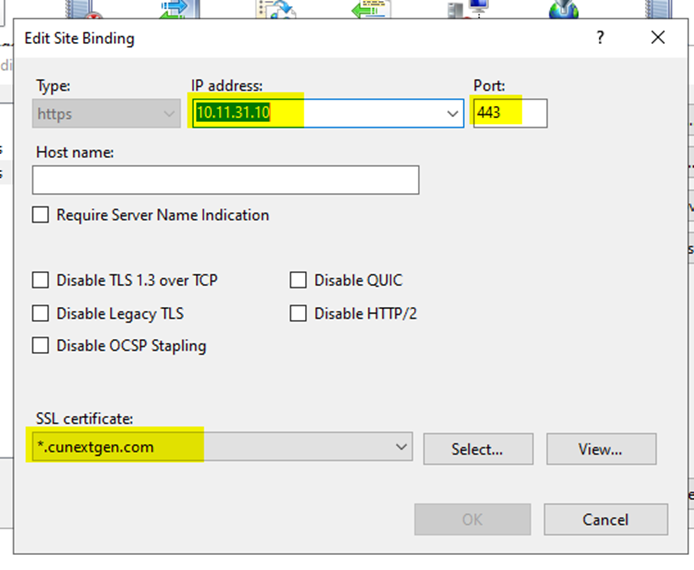
Fig 17: Adding new binding for load balancer push notification.
Step 3:
In the Application settings of Forms, include the IP addresses of the current server and other load-balanced servers in the AllowedSingleIPs values.
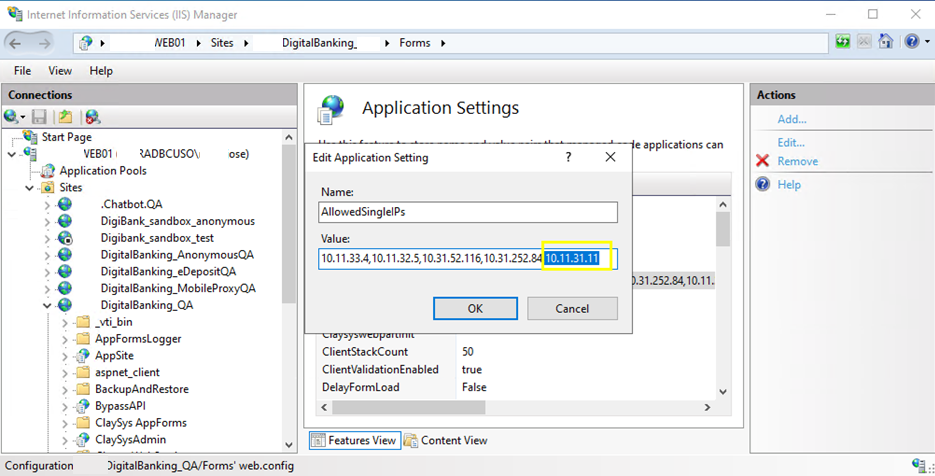
Fig 18: Adding server IPs of other servers in the load balancer.
Step 4:
Add the right URL for the load balance site to the SignalRUrl in the Application settings of Forms and Appsite.
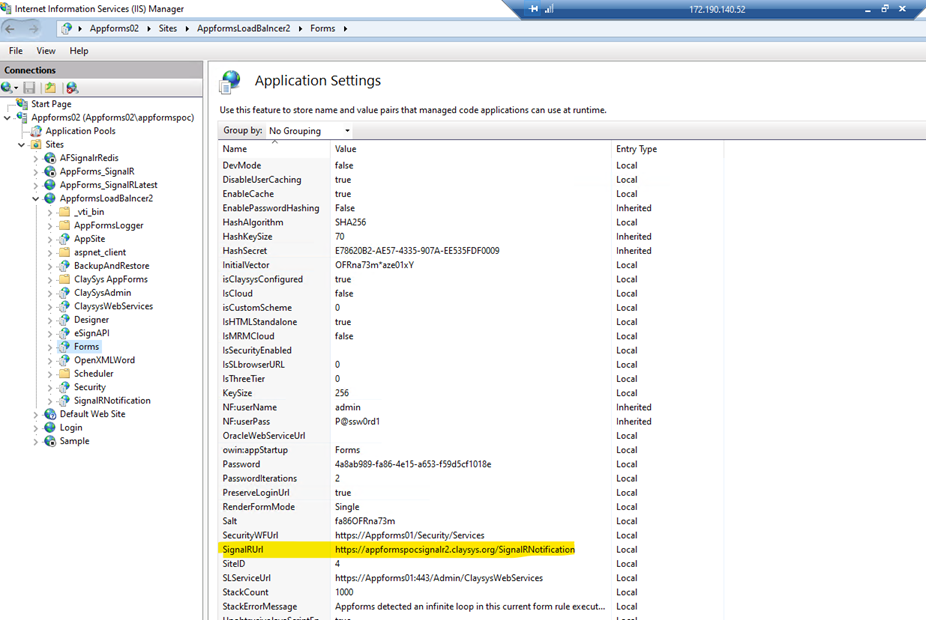
Fig 19: Adding LoadBalance URL to the SignalRUrl in the Application Settings
Step 5:
Create a table in the MetaDB named “NF_IPLookup” for record the MachineNames and the binding details. The field names are “MachineName” , “TargetBindingIP” and “BindingParams”. The table should contain the data of each load balancing machine.
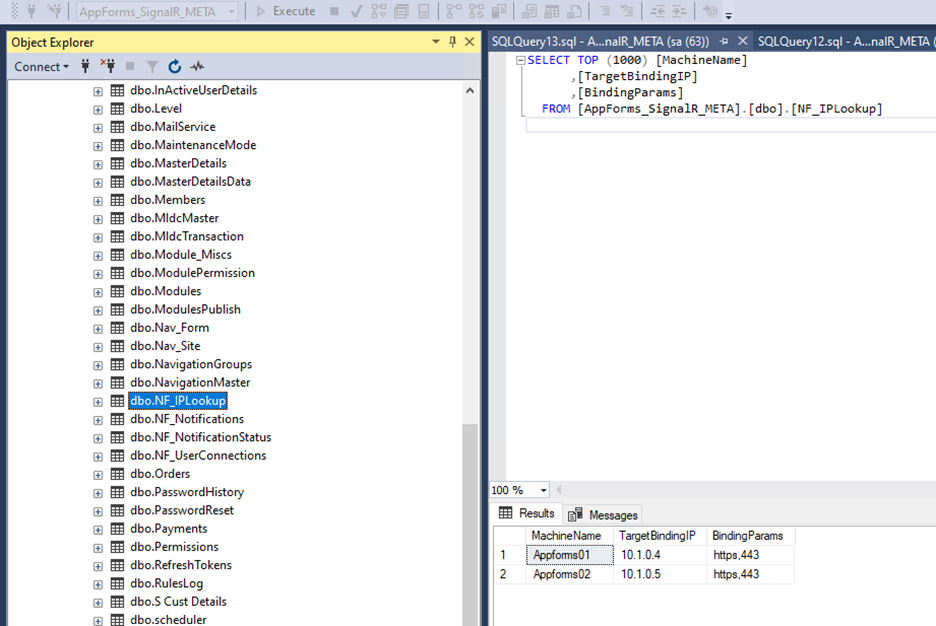
Fig 20: Create “NF_IPLookup” table in MetaDB
The Push notification feature will allow sending push notification using Signal R technology. We presented information about sending Push Notifications to user(s)/group(s) and provided images for ease. This document introduced two ways of sending Push Notifications that can go well with any form, so that the users can meet their requirements.